Sunday, April 21, 2024

Spinach soufflé (easy version) ほうれん草のスフレ

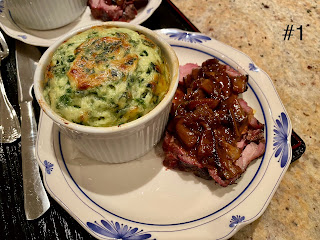
My wife is partial to spinach soufflé. I made it previously using the traditional way in which egg yolks and whites are separated and the whites whipped before being incorporated into the rest of the ingredients. Then we learned from Jacques Pepin that there are two simpler ways to make souffle. One is to just use a whole egg rather than separating it. The other was to make  a corn soufflé  without even making a béchamel by using fresh corn pure instead. Those two methods were much easier. Recently we tried a variation of another soufflé recipe from Pepin which he called (Maman’s cheese soufflé recipe). We saw the recipe presented on YouTube. Again we used whole eggs rather than separating the yolks and whites. Although we adopted the idea of using a whole egg in the souffle, we did not make Maman’s cheese souffle instead we tailored the recipe to make spinach souffle by adding spinach and onion. It did not rise as much as we expected but it was pretty good. We served it with roasted lamb with mushroom port wine sauce (picture #1).


We cooked it in small but deep ramekins (picture #2). If we used shallower and wider opening vessels like one used by Pepin, it may have risen more but this was just fine and tasted really great.


Again, we modified the recipe in several ways. One modification is that I used much less butter than is used in classic Béchamel sauce; in the classic the same amount of butter and flour is used. I add finely chopped onion and/or mushrooms in addition to the butter. The flour coats the surface of the fat covered onion and makes the resulting Béchame without lumps. This is not a precise recipe but just a note for myself.

Ingredients: (made two large ramekins full, 2 inches in diameter)
1 medium shallot, finely chopped
2 tbs unsalted butter
3 tbs Ap flour
1/2 cup or more milk
1/4 cup spinach, cooked and moisture squeezed, finely chopped (I cooked it without added water in a wok with a lid and then squeezed out any remaining moisture using a ricer).
1/2 cup Gruyere cheese, grated
3 large eggs, well beaten
Back pepper, salt and nutmeg for taste

Butter and grated parmesan cheese to lightly grease the ramekins.

Directions:
In a frying pan, melt the butter and cook the shallot for a few minutes, add the flour and mix for one minute after the dry flour disappears
Add cold milk at once and mix using a silicon spatula until well mixed and thickened. Add the cheese and mix (adjust the thickness by adding more milk)
Add the spinach and seasonings and let it cook for 5 minutes then add to the beaten eggs and mix.
Pour the mixture into the prepared ramekins (70% full) (as per Pepin, this can be stored in the refrigerator for a few days before cooking).
Bake for 30-35 minutes in a preheated 375F oven (I used our toaster oven in convection mode).

It did not rise as much as our previous soufflé but it did rise and tasted great with good texture. This is much easier to make. My wife was quite satisfied with it.

Wednesday, April 10, 2024

Mini Fruit Galettes ミニフルーツガッレト

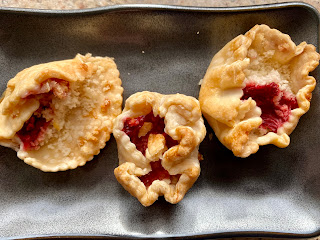
We had an excess of strawberries which were nonetheless pretty good. So how to use them? My wife happened to come across a recipe for “Mini fruit galettes” in the Washington Post. Although the original recipe involved making a crust from scratch, she had some pie dough in the freezer which was a bit old so she decided to take a short cut and use that instead. While this rendition was more than adequate and quite good for a small but not too sweet desert there is room for improvement. Since the dough was fairly old it was a bit dry and kept opening up. (As shown by the little pie on the left in the picture). Also, a bit more strawberry filling would have been helpful.


Ingredients:
Two Pillsbury refrigerated pie crusts   
1/2 cup plain dried breadcrumbs (I used panko)
1/4 cup granulated sugar
1/4 cup cornstarch
2 cups strawberries (or tart pitted cherries and/or peeled, diced peaches as per the original recipe)
2 tablespoons fresh lemon juice
2 tablespoons Grand Marnier, another orange-flavored liqueur (we used Triple Sec) or 1/2 teaspoon almond extract
2 teaspoons cold unsalted butter, each cut into equal pieces
1 large egg
1 tablespoon water
1/8 teaspoon kosher salt
About 1/4 cup sparkling sugar or turbinado sugar, for sprinkling

Directions:
Line a baking sheet with parchment paper.
Cut the dough into two inch round portions using a biscuit cutter. (A slightly larger size might work a bit better). Roll out the dough a bit thinner. Scatter 1 tablespoon of the dried bread crumbs across the center, leaving a margin all around. (In the upper left hand corner of the picture #1, a crust with the crumbs on it is just visible.) (These bread crumbs are extremely important. They soak up any excess juice and make a nice almost jelly like filling.)


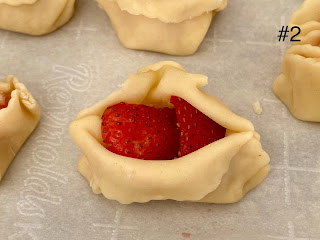
Stir together the granulated sugar and cornstarch in a mixing bowl. Add the fruit, lemon juice and Grand Marnier (Triple Sec) or almond extract; stirring well to coat the fruit. Scoop out a scant spoon full and put in the center of the piece of dough. Working quickly, lift the outside of the dough edge and pull it up and slightly over the filling, leaving the fruit in the center exposed. (This proved more difficult than we expected. Although we moistened the edges of the dough, it kept opening with the filling spilling out. But with some effort we made it work).

Work around each galette, folding the dough over on itself and forming a series of pleats to make a snug package. Use the outside edge of your hands to cup the edges of the galette and gently press the dough into the fruit. Snuggle one small cube of butter into the center opening. Place the galette on the baking sheet. Repeat with the remaining dough rounds, filling and butter.


Freeze them, uncovered, for 30 to 45 minutes, until firm.

Preheat oven to 400 degrees. Lightly beat the egg, water and salt in a small bowl. Brush the folded edges of each galette with the egg wash, then sprinkle them with the sugar. Bake for 20 to 25 minutes, until deeply golden brown with bubbling filling.
Cool for a bit before serving.

The crispy buttery pie crust was a nice contrast and went well with the strawberry jellly-like filling. The egg wash with the sugar coating caramelized and made a sweet crunch to bite into. The bread crumbs in the center of the dough is a technique to keep in mind for other baked pie goods. Because they soaked up the excess juice the pie crust did not get soggy and remained nicely crispy. My wife said she will make this again with improvements; one of which is the use of dough that is not quite so dry (old).

Saturday, April 6, 2024

Kabocha salad カボチャのサラダ

We regularly get Japanese/Asian groceries from Weee. This time we got a Japanese “Kabocha” かぼちゃ squash. It was larger than usual. I made my usual simmered kabocha and pottage かぼちゃの煮物とポタージュ but some still remained. I thought about tempura but that was too much work for such a small piece. So I decided to make this “kabocha salad”. I did not follow any particular recipe but sort of combined two different recipes. This is curry flavored and turned out to be quite good highlighting the natural sweetness of the kabocha.


This is just a note for myself.

Ingredients:
Kabocha squash, seeds removed, skin shaved off (optional), cut into half inch cubes
Raisins

For the dressing
Greek yogurt
Mayonnaise
Curry powder
Salt and pepper to taste

Directions:
Boil the kabocha in salted water for 5-7 minutes until cooked but not too mushy
Mix the ingredients for the dressing (about the same amount of mayo and yogurt, the amount of curry powder is to your liking)

For an impromptu salad, this was much better than I expected. The natural sweetness of the kabocha was complemented by the curry flavor. The mixture of the yogurt, mayo and kabocha made a nice creamy texture with some tartness. I will make this again.

P.S. Hawk joins us for Hanami 花見!
This year was a bit unusual for the cherry blossoms. The trees bloomed early and the blooms lasted for a long time. Since we have three trees with different bloom timing, we had a very long time to enjoy cherry blossoms or “Hanami”. One afternoon, a hawk joined us for Hanami! We looked out the window and there he was in all his magnificence sitting not ten feet from the window on the railing of the deck. We marveled at the image of such an awesome creature juxtaposed to the delicate loveliness of the cherry blossoms.


Thursday, March 28, 2024

St. Patrick’s Day Dinner, Lamb Chops and Cabbage with Bacon セイント パトリクス デイ

While taking inventory of the deep depths of the freezer, my wife came upon 2 thick cut lamb chops; perfect for St. Patrick’s day dinner.  So we cooked the lamb chops and served them with a side of cabbage and bacon as well as rice pilaf (#1). For a change, I managed to cook the lamb to near perfect medium rare. After seasoning with salt and pepper, I seared the chops without any oil on both sides and finished them in a 350F oven. After 5 minutes I started measuring the temperature at the center of the chops. Around 10 minutes, it reached 135F.


We also made cabbage, onion with bacon.


We just cooked this without any particular recipe.

Ingredients:
4 cabbage leaves, center thick veins removed and cut into 1/2 inch squares
1 medium onion, sliced
3 strips of bacon
3 tbs chicken broth or water
Salt and pepper to taste

Directions:
Fry the bacon strips until crispy and set aside on a paper towel lined plate leaving the bacon dripping in the pan
Sauté the onion until well cooked and brown
Add the cabbage and mix
Add water or chicken broth, place the lid and steam until liquid almost all gone
Add the crumbled bacon and season with salt and pepper to taste

This was a great somewhat traditional way to celebrate St. Paddy’s day. Even though it was completely spontaneous and not planned, things don’t get better than this. Next stop the spring equinox.

Monday, March 25, 2024

Mary Walsh's Currant Cake マリイウオルシュのカラントケーキ

We like food themed travel shows. One of which was by Phil Rosenthal. It started as a PBS show “I’ll Have What Phil is Having” which evolved into a Netflix show called “Somebody feed Phil”. Although we had forgotten about it, turns out we had a copy of “Somebody feed Phil The book”. We rediscovered it while looking for another cookbook on the book shelf. It is an interesting read of behind-the-scene stories of the first 4 seasons but it also contains recipes provided by the local chefs they visited during the show. Among those recipes, was one titled “Mary Walsh’s Currant Cake”. Since St. Patrick's day was coming up and the current cake was basically an Irish soda bread my wife decided to make it. According to the book, although it was called current cake one of the secrets of why it tasted so good was that Mary didn’t use currents. She used sultanas (golden raisins) instead. Maybe she used sultanas because she didn’t have any currents. We, of course, didn’t have any currants either (we also didn’t have any sultanas). So my wife used raisons and dried fruit medley from Harry and David. (So really we should probably call our version dried fruit medley cake). As the queen of ingredient substitution in recipes my wife did not stop there. The recipe called for orange and lemon zests but we did not have any oranges. We did, however, have some Meyer lemons which have a flavor that is a cross between a lemon and an orange. So she used that instead and it worked well.

You can see the dried fruit medley and raisins on the cut-surface (picture #1)


Ingredients:
2 ounces (½ stick/55g) unsalted butter (room temperature), plus more for the pan
3¼ cups (450g) all-purpose flour, plus more for dusting
2 tablespoons (25g) castor or light or dark brown sugar
½ teaspoon baking soda
½ teaspoon kosher salt
Zest of 2 Meyer lemons
1 cup dried fruit medley
1 cup of raisins
1 large egg
1¼ cups (300ml) buttermilk
2 tablespoons (30ml) heavy whipping cream
1 tablespoon brown sugar

Directions:
Preheat the oven to 425°F (220°C) and place a baking rack in the lower third of the oven.
Lightly butter an 8-inch round cake pan. In a large bowl, mix the flour, brown sugar, baking soda, and salt together. Use your fingers to rub the butter into the dry ingredients. Use a citrus peeler to zest the Meyer lemons. Add all the zest and the dried fruit to the bowl with the flour mixture and stir until well combined.

Put the egg in a medium bowl and whisk in the buttermilk and cream. Set aside 2 tablespoons of the buttermilk mixture.

Make a well in the center of the dry ingredients and pour in the remaining buttermilk, stirring to make a very moist, shaggy dough. Or, use your hands: grip the edge of the bowl with one hand, stir with a broad circular motion with the other. Turn the dough out onto a well-floured work surface and dust your hands lightly with flour. Gently shape the dough into a thick, roughly 6-inch (15cm) round and use a bench scraper or large spatula to transfer the dough to the center of the cake pan.

Brush the top and sides of the dough with the reserved buttermilk mixture and sprinkle the remaining brown sugar on top (#2). Put the cake pan in the oven, reduce the temperature to 400°F (180°C).


Bake for about 40 minutes until the bread is lightly golden brown on top and sounds hollow when tapped (#3). Transfer the bread to a wire rack and let cool for about 20 minutes. Cut the bread into thick slices and serve it warm with butter.


This is a very nice soda bread. Perfect for Saint Patrick’s day. It had a dense moist texture and a mild slightly sweet taste. The robust flavor of the butter milk as well as the citrus note from the Meyer lemon zest came through nicely. The dried fruit added a nice burst of sweetness.

Friday, March 22, 2024

Duck Tender Cutlet and Arancini 鴨ささみのカツレツ

Looking ahead to the up coming Easter dinner my wife ordered a bone-in forequarter lamb roast from D’ArtagnanShe also ordered lamb tenderloins (which we’ve had before) and something we have never had before but which she wanted to try; duck tenders. They came as a fairly large quantity frozen in a single package (picture #4). I was intrigued by a french recipe which I saw in D’Artagnan website entitled “Yakitori de canard” 鴨ささみの焼き鳥. It was in french and although I did not look at it my wife assured me she could probably translate it if I wanted to try it. Nonetheless I can easily imagine this would be made exactly like chicken tender yakitori. (Hence no translation necessary.) But that is beside the point because I also wanted to make “arancini” for this meal. So it was “cutlet de canard” on the menu instead. In the picture #1, the top are arancini cut in half showing melted mozzarella cheese and the bottom shows the duck tender cutlet.


The duck tender is dark meat as opposed to chicken tender (picture #2) and has much more flavor.


The arancini was made of leftover shiitake mushroom risotto.


There is nothing special about making duck tender cutlet. After semi-thawing this is the amount we had (picture #4). They were frozen in a big one mass. I had to separate each tenders and vacuum packed 5-6 tenders per bag. I left one package for immediate consumption. Initially I was thinking of marinating the tenders before cooking but taking my wife’s suggestion that since we have never had them before we should taste them as is without any flavoring that might mask the original flavor. I opted to just lightly salt and pepper then breading them and cooking them the same as any other type of cutlet.


I was afraid of the duck tender to become dry after cooking but that was not the case and had much more flavor than chicken tender. I will definitely try to make “Yakitori de canard” next.

Wednesday, March 13, 2024

“Roman” Gnocchi ローマンニョキ

We like gnocchi and every time we cook chicken or pork on the Weber grill, we also cook potatoes and my wife often makes gnocchi from any potatoes left over. She cooks the gnocchi and then freezes them. To serve we heat them up in the toaster oven. Recently, she saw a recipe for “Roman” gnocchi on the Washington post web site and decided she had to make it. This gnocchi is not made with potato but, instead, semolina flour. Also, instead of boiling and then pan frying it is baked (or more accurately oven fried in melted butter). We served this one evening as a part of multiple small “otoshi” snacks. It has nice crust with soft inside with buttery flavor quite different from traditional gnocchi.


The original recipe came from Washington Post.

Ingredients:
8 tablespoons (1 stick) unsalted butter, cut into small pieces and divided, plus more for greasing the dish
4 cups whole milk
1/4 teaspoon fine salt, plus more to taste
1 1/2 cups (9 ounces) semolina, preferably coarse
2 large egg yolks
3 ounces pecorino Romano cheese, finely grated and divided (1 1/2 lightly packed cups) (She used parmegiano reggiano
Freshly ground black pepper

Although I made the gnocchi according to the original recipe these are the changes I would make to the original recipe if I made it again. I would halve the recipe. I would significantly reduce the butter because under the original recipe the gnocchi was swimming in butter when it came out of the oven. I would cook the semolina in the milk slightly differently as described below.

Ingredients: (1/2 recipe)
2 tablespoons unsalted butter, cut into small pieces and divided, plus more for greasing the dish
2 cups whole milk
1/8 teaspoon fine salt, plus more to taste
3/4 cups semolina, preferably coarse
1 large egg yolks
3/4 cup ounces finely grated cheese finely grated and divided (1 1/2 lightly packed cups)
Freshly ground black pepper

Directions:
Position a rack in the middle of the oven and preheat to 400 degrees.
Use a little butter to grease a 9-by-13-inch baking dish (if using the original recipe, the smaller baking dish if using the changed recipe).

In a medium saucepan over medium-high heat, combine the milk and salt. Stirring and scraping the bottom of the pot with a rubber spatula to prevent scorching, bring to a simmer and reduce the heat to medium-low to prevent a boil-over.

Then sprinkle in the semolina, stirring constantly as you do. Cook, stirring, until the mixture is so thick that the spatula can stand in the middle without falling over, 2 to 3 minutes. (Although this is what the recipe suggests when I did it the semolina hit the hot liquid and immediately formed lumps. So in the future I suggest adding the semolina to the cool liquid and then gently heating it up. This way the semolina can be evenly distributed in the liquid before it starts to firm up when heated.)

Let cool for a few minutes, then add half of the butter (4 tablespoons) and 1/2 cup of the cheese, stirring until the butter and cheese melt and the mixture is thoroughly combined. Add the egg yolks, one at a time, and stir until incorporated. The mixture should be the texture of thick mashed potatoes.

Scrape the semolina mixture onto a large sheet pan and use wet hands, a damp knife or offset spatula to spread it out evenly, and pat the top to smooth it. (It should be about 1/2 inch thick, but it’s okay if it’s a little thicker.) Let cool to room temperature, about 5 minutes.

Fill a small bowl with water. Dip a two-inch cookie cutter, biscuit cutter or drinking glass in the water and use it to stamp out rounds, re- dipping frequently, or use a knife to cut it into two-inch squares. If cutting into rounds, mush together and spread out the scraps again and keep cutting, repeating until all of the mixture is used.

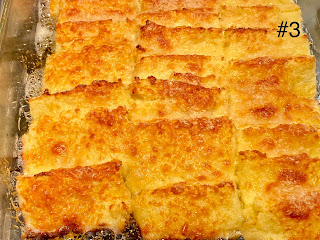
Arrange the pieces in overlapping rows, like shingles, in the buttered baking dish (#2). Sprinkle them with the remaining cheese, and top with the remaining pieces of butter.

Bake for 15 to 20 minutes, or until the cheese is browned in spots (#3). Grind a generous amount of pepper on top and serve warm.


This is very different from the gnocchi made with potatoes but it tasted pretty good and has real potential with a few changes. The outside was crispy and the inside soft. It had a pleasing mild flavor of the cheese. It may not be good for you since it has lots of cheese, egg yolks and then oven fried in melted butter. My wife thinks she could cut down on the butter next time. Although the gnocchi was litterly swimming in butter when it came out of the oven the melted butter in the baking dish was completely absorbed as it cooled.