Showing posts with label Baked. Show all posts

Sunday, April 21, 2024

Spinach soufflé (easy version) ほうれん草のスフレ

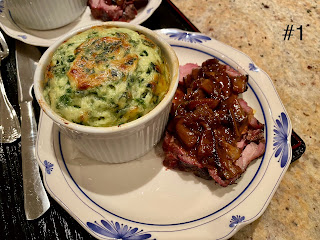
My wife is partial to spinach soufflé. I made it previously using the traditional way in which egg yolks and whites are separated and the whites whipped before being incorporated into the rest of the ingredients. Then we learned from Jacques Pepin that there are two simpler ways to make souffle. One is to just use a whole egg rather than separating it. The other was to make  a corn soufflé  without even making a béchamel by using fresh corn pure instead. Those two methods were much easier. Recently we tried a variation of another soufflé recipe from Pepin which he called (Maman’s cheese soufflé recipe). We saw the recipe presented on YouTube. Again we used whole eggs rather than separating the yolks and whites. Although we adopted the idea of using a whole egg in the souffle, we did not make Maman’s cheese souffle instead we tailored the recipe to make spinach souffle by adding spinach and onion. It did not rise as much as we expected but it was pretty good. We served it with roasted lamb with mushroom port wine sauce (picture #1).


We cooked it in small but deep ramekins (picture #2). If we used shallower and wider opening vessels like one used by Pepin, it may have risen more but this was just fine and tasted really great.


Again, we modified the recipe in several ways. One modification is that I used much less butter than is used in classic Béchamel sauce; in the classic the same amount of butter and flour is used. I add finely chopped onion and/or mushrooms in addition to the butter. The flour coats the surface of the fat covered onion and makes the resulting Béchame without lumps. This is not a precise recipe but just a note for myself.

Ingredients: (made two large ramekins full, 2 inches in diameter)
1 medium shallot, finely chopped
2 tbs unsalted butter
3 tbs Ap flour
1/2 cup or more milk
1/4 cup spinach, cooked and moisture squeezed, finely chopped (I cooked it without added water in a wok with a lid and then squeezed out any remaining moisture using a ricer).
1/2 cup Gruyere cheese, grated
3 large eggs, well beaten
Back pepper, salt and nutmeg for taste

Butter and grated parmesan cheese to lightly grease the ramekins.

Directions:
In a frying pan, melt the butter and cook the shallot for a few minutes, add the flour and mix for one minute after the dry flour disappears
Add cold milk at once and mix using a silicon spatula until well mixed and thickened. Add the cheese and mix (adjust the thickness by adding more milk)
Add the spinach and seasonings and let it cook for 5 minutes then add to the beaten eggs and mix.
Pour the mixture into the prepared ramekins (70% full) (as per Pepin, this can be stored in the refrigerator for a few days before cooking).
Bake for 30-35 minutes in a preheated 375F oven (I used our toaster oven in convection mode).

It did not rise as much as our previous soufflé but it did rise and tasted great with good texture. This is much easier to make. My wife was quite satisfied with it.

Wednesday, April 10, 2024

Mini Fruit Galettes ミニフルーツガッレト

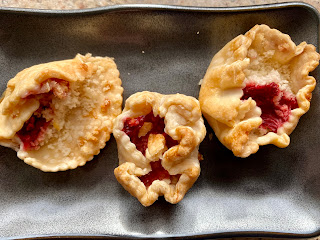
We had an excess of strawberries which were nonetheless pretty good. So how to use them? My wife happened to come across a recipe for “Mini fruit galettes” in the Washington Post. Although the original recipe involved making a crust from scratch, she had some pie dough in the freezer which was a bit old so she decided to take a short cut and use that instead. While this rendition was more than adequate and quite good for a small but not too sweet desert there is room for improvement. Since the dough was fairly old it was a bit dry and kept opening up. (As shown by the little pie on the left in the picture). Also, a bit more strawberry filling would have been helpful.


Ingredients:
Two Pillsbury refrigerated pie crusts   
1/2 cup plain dried breadcrumbs (I used panko)
1/4 cup granulated sugar
1/4 cup cornstarch
2 cups strawberries (or tart pitted cherries and/or peeled, diced peaches as per the original recipe)
2 tablespoons fresh lemon juice
2 tablespoons Grand Marnier, another orange-flavored liqueur (we used Triple Sec) or 1/2 teaspoon almond extract
2 teaspoons cold unsalted butter, each cut into equal pieces
1 large egg
1 tablespoon water
1/8 teaspoon kosher salt
About 1/4 cup sparkling sugar or turbinado sugar, for sprinkling

Directions:
Line a baking sheet with parchment paper.
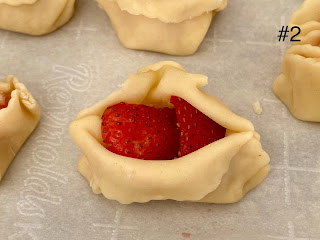
Cut the dough into two inch round portions using a biscuit cutter. (A slightly larger size might work a bit better). Roll out the dough a bit thinner. Scatter 1 tablespoon of the dried bread crumbs across the center, leaving a margin all around. (In the upper left hand corner of the picture #1, a crust with the crumbs on it is just visible.) (These bread crumbs are extremely important. They soak up any excess juice and make a nice almost jelly like filling.)


Stir together the granulated sugar and cornstarch in a mixing bowl. Add the fruit, lemon juice and Grand Marnier (Triple Sec) or almond extract; stirring well to coat the fruit. Scoop out a scant spoon full and put in the center of the piece of dough. Working quickly, lift the outside of the dough edge and pull it up and slightly over the filling, leaving the fruit in the center exposed. (This proved more difficult than we expected. Although we moistened the edges of the dough, it kept opening with the filling spilling out. But with some effort we made it work).

Work around each galette, folding the dough over on itself and forming a series of pleats to make a snug package. Use the outside edge of your hands to cup the edges of the galette and gently press the dough into the fruit. Snuggle one small cube of butter into the center opening. Place the galette on the baking sheet. Repeat with the remaining dough rounds, filling and butter.


Freeze them, uncovered, for 30 to 45 minutes, until firm.

Preheat oven to 400 degrees. Lightly beat the egg, water and salt in a small bowl. Brush the folded edges of each galette with the egg wash, then sprinkle them with the sugar. Bake for 20 to 25 minutes, until deeply golden brown with bubbling filling.
Cool for a bit before serving.

The crispy buttery pie crust was a nice contrast and went well with the strawberry jellly-like filling. The egg wash with the sugar coating caramelized and made a sweet crunch to bite into. The bread crumbs in the center of the dough is a technique to keep in mind for other baked pie goods. Because they soaked up the excess juice the pie crust did not get soggy and remained nicely crispy. My wife said she will make this again with improvements; one of which is the use of dough that is not quite so dry (old).

Wednesday, March 13, 2024

“Roman” Gnocchi ローマンニョキ

We like gnocchi and every time we cook chicken or pork on the Weber grill, we also cook potatoes and my wife often makes gnocchi from any potatoes left over. She cooks the gnocchi and then freezes them. To serve we heat them up in the toaster oven. Recently, she saw a recipe for “Roman” gnocchi on the Washington post web site and decided she had to make it. This gnocchi is not made with potato but, instead, semolina flour. Also, instead of boiling and then pan frying it is baked (or more accurately oven fried in melted butter). We served this one evening as a part of multiple small “otoshi” snacks. It has nice crust with soft inside with buttery flavor quite different from traditional gnocchi.


The original recipe came from Washington Post.

Ingredients:
8 tablespoons (1 stick) unsalted butter, cut into small pieces and divided, plus more for greasing the dish
4 cups whole milk
1/4 teaspoon fine salt, plus more to taste
1 1/2 cups (9 ounces) semolina, preferably coarse
2 large egg yolks
3 ounces pecorino Romano cheese, finely grated and divided (1 1/2 lightly packed cups) (She used parmegiano reggiano
Freshly ground black pepper

Although I made the gnocchi according to the original recipe these are the changes I would make to the original recipe if I made it again. I would halve the recipe. I would significantly reduce the butter because under the original recipe the gnocchi was swimming in butter when it came out of the oven. I would cook the semolina in the milk slightly differently as described below.

Ingredients: (1/2 recipe)
2 tablespoons unsalted butter, cut into small pieces and divided, plus more for greasing the dish
2 cups whole milk
1/8 teaspoon fine salt, plus more to taste
3/4 cups semolina, preferably coarse
1 large egg yolks
3/4 cup ounces finely grated cheese finely grated and divided (1 1/2 lightly packed cups)
Freshly ground black pepper

Directions:
Position a rack in the middle of the oven and preheat to 400 degrees.
Use a little butter to grease a 9-by-13-inch baking dish (if using the original recipe, the smaller baking dish if using the changed recipe).

In a medium saucepan over medium-high heat, combine the milk and salt. Stirring and scraping the bottom of the pot with a rubber spatula to prevent scorching, bring to a simmer and reduce the heat to medium-low to prevent a boil-over.

Then sprinkle in the semolina, stirring constantly as you do. Cook, stirring, until the mixture is so thick that the spatula can stand in the middle without falling over, 2 to 3 minutes. (Although this is what the recipe suggests when I did it the semolina hit the hot liquid and immediately formed lumps. So in the future I suggest adding the semolina to the cool liquid and then gently heating it up. This way the semolina can be evenly distributed in the liquid before it starts to firm up when heated.)

Let cool for a few minutes, then add half of the butter (4 tablespoons) and 1/2 cup of the cheese, stirring until the butter and cheese melt and the mixture is thoroughly combined. Add the egg yolks, one at a time, and stir until incorporated. The mixture should be the texture of thick mashed potatoes.

Scrape the semolina mixture onto a large sheet pan and use wet hands, a damp knife or offset spatula to spread it out evenly, and pat the top to smooth it. (It should be about 1/2 inch thick, but it’s okay if it’s a little thicker.) Let cool to room temperature, about 5 minutes.

Fill a small bowl with water. Dip a two-inch cookie cutter, biscuit cutter or drinking glass in the water and use it to stamp out rounds, re- dipping frequently, or use a knife to cut it into two-inch squares. If cutting into rounds, mush together and spread out the scraps again and keep cutting, repeating until all of the mixture is used.

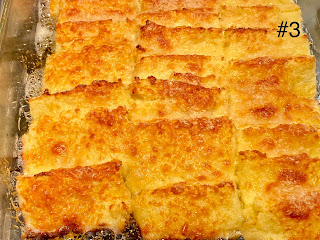
Arrange the pieces in overlapping rows, like shingles, in the buttered baking dish (#2). Sprinkle them with the remaining cheese, and top with the remaining pieces of butter.

Bake for 15 to 20 minutes, or until the cheese is browned in spots (#3). Grind a generous amount of pepper on top and serve warm.


This is very different from the gnocchi made with potatoes but it tasted pretty good and has real potential with a few changes. The outside was crispy and the inside soft. It had a pleasing mild flavor of the cheese. It may not be good for you since it has lots of cheese, egg yolks and then oven fried in melted butter. My wife thinks she could cut down on the butter next time. Although the gnocchi was litterly swimming in butter when it came out of the oven the melted butter in the baking dish was completely absorbed as it cooled.

Thursday, March 7, 2024

Salted Oatmeal Cookie

We are a big fan of savory cookies. My wife came across this recipe for “Salted oatmeal cookies” and decided to make it. It turned out this is not quite “savory” but has a nice contrast of salty and sweet and pretty good.


The recipe came from Washington Post.

Ingredients (made 33 small cookies)
12 tablespoons (1 1/2 sticks/170 grams) unsalted butter, softened
1 cup (220 grams) packed light brown sugar 1/2 cup (100 grams) granulated sugar
1 teaspoon baking powder
1/4 teaspoon baking soda
1/4 teaspoon ground cinnamon
2 large eggs
1 teaspoon vanilla extract
2 cups (180 grams) rolled oats (do not use quick-cooking or instant)
1 3/4 cups (219 grams) all-purpose flour Flaky sea salt, for sprinkling

Directions:
Beat the butter in the bowl of a stand mixer or handheld electric mixer for a few minutes on medium-high speed until light and fluffy. Stop to scrape down the sides of the bowl.

Add the brown and granulated sugars, baking powder, baking soda and cinnamon, beating on medium speed until the mixture is well blended. Reduce the speed to medium-low; add the eggs and vanilla extract, mixing until well incorporated.

Reduce the speed to low; add the oats and flour stopping to scrape down the sides of the bowl as needed and mixing just until incorporated. Cover the bowl and refrigerate the dough for at least 1 hour, until needed.

Position a rack in the middle of the oven and preheat to 375 degrees. Line a large sheet pan with parchment paper.

Form the dough into golf ball-size balls and place about 2 inches apart on the prepared sheet. Sprinkle generously with flaky salt (the second picture).

Bake one sheet at a time for about 15 minutes, or until the cookies are puffed and beginning to turn golden, being careful not to overbake. (The cookies should have a tender interior.) Transfer the cookies, still on the parchment paper, to a wire rack to cool completely.


The contrast between the salt and the sweet are what really make these cookies. The out side is crunchy and the inside is soft. As you can see in the picture the oats retain their shape and provide an additional element of crunch.

Sunday, February 18, 2024

Cranberry Camembert cheese bites クランベリーソース、カマンベールチーズ バイツ

We, especially my wife, like small appetizers or bites. She came across this recipe on-line and decide to make it. We had leftover “figgy cranberry sauce” which I had made for Thanksgiving. The original recipe called for brie cheese but she used camembert instead. These small bits are good but the cheese did not melt much and did not impart much flavor. This can be improved upon but has potential to be a very good appetizer. She tried two versions; one with the cranberry sauce on the top (picture #1) and one with the cranberry on the bottom (#2). Both tasted the same but the cranberry sauce on the top looked better to us.


The original “Cranberry Brie Bites” recipe came from “All Recipes”.

Ingredients
1 (8 ounce) round Camembert cheese
1 sheet frozen puff pastry, thawed (suggest pie crust or wonton skin could be used too)
1⁄2 cup cranberry sauce (we used figgy cranberry sauce)
1⁄2 cup finely chopped walnuts sea salt to taste

Directions
Remove and discard rind from Camembert cheese. (Place cheese in the freezer for 20 minutes to make it easier to cut).
Meanwhile, oil a 24-cup mini muffin pan with butter.
Roll puff pastry sheet out into a 10x14-inch rectangle. Cut sheet lengthwise into 4 even strips and then crosswise into 6 even strips, making 24 squares. Separate squares and gently press each one into a prepared muffin cup (#3). (Following these instructions resulted in rectangular squares which did not fit well into the muffin cup. We found the pieces had to be either square or round to fit properly.) 
Remove chilled Camembert from the freezer; cut into 24 pieces, approximately 3/4-inch in size.
Add 1 teaspoon cranberry sauce to each pastry-lined muffin cup, then press in a piece of Brie and top with 1 teaspoon chopped walnuts. Season each bite with a pinch of sea salt. Transfer muffin pan to the refrigerator and chill for at least 30 minutes, or cover and chill for up to 3 days. When ready to bake, preheat the oven to 400 degrees F (200 degrees C).
Bake bites in the preheated oven until golden brown, 18 to 20 minutes (#4)


The most difficult part of the recipe is making the pastry cups. My wife said, she saw little point in using puff pastry since there was little room for it to expand in this preparation. She said next time she may use either commercial pie crust or wonton skin. The combination of the cranberry sauce and walnuts worked very well together. The cheese contributed little flavor but a slightly chewy texture. Next time we’ll try a nice savory cheddar.

P.S. Recently we were expecting 3-6 inches accumulation of snow overnight. Fortunately, the temperature was not low enough for that to happen and the accumulation was much less than expected. In addition most of the snow melted from the pavement. The grassy areas and trees, however, were covered with snow including the Japanese plum tree in our back yard that was in full bloom. This has happened several times in the past. It is one of the remarkable characteristics of this type of plum tree. It blooms early in the year; late January to early March. Yet the tree and blossoms survive even when hit with the snowy cold weather characteristic of that time of year. Also, the blossoms exude a lovely fragrance which gently wafts across the yard when it is in bloom. It is a remarkable experience to breathe in that lovely smell while looking at blossoms completely covered in snow such as the ones shown here. 


Sunday, February 11, 2024

Sweet Onion Bread Pudding 玉ねぎのブレッドプディング

I do not know how my wife decided to make this dish. She apparently saw this recipe on line and decided to make it.  The recipe calls for cubes of bread. She did not feel like using our home-baked milkbread or other breads we baked. So we ended up getting a loaf of whole wheat bread from Whole Foods. Although the original recipe was called “soufflé”, this is not a souffle. My wife decide to call it “bread pudding”. In any case, this is a good side dish. For the first time we tasted it, onion flavor was sort of strong (even though we used sweet onion and sautéed for a long time). But it calmed down and eventually tasted just right. It heats up  nicely by briefly microwaving. As shown in the picture we served this as a snack with Greek rice stuffed grape leaves (dolma or dolmadakia, store bought)


The recipe came from “Southern living”.

Ingredients: Recipe X 1/2
1 tablespoon butter
2 cups chopped Vidalia onions
1 cups fresh bread cubes (crusts removed) 
6 oz. evaporated milk
2 large eggs, lightly beaten
3/4 cups shredded Parmesan cheese (or combination of other cheeses)
1/2 teaspoon salt

Ingredients (Original recipe)
2 tablespoons butter
4 cups chopped Vidalia onions
2 cups fresh bread cubes (crusts removed)
1 (12-oz.) can evaporated milk
3 large eggs, lightly beaten
1 1/4 cups shredded Parmesan cheese (or combination of other cheeses)
1 teaspoon salt

Directions
Melt butter in a large skillet over medium heat; add chopped onion, and sauté 10 to 15 minutes or until tender.
Place onion and bread cubes in a large bowl. Stir in milk, eggs, 1 cup cheese, and salt. Pour into a lightly greased soufflé or baking dish. (For 1/2 recipe I used the smallest pyrex baking dish). Sprinkle with remaining 1/4 cup cheese.
Bake at 350 ̊ for 25 minutes or until set.


This is basically an onion flavored bread pudding. It is very flavorful (and very rich). Initially the onion was quite strong. It got better with time as the onion flavor blended into the cheese and bread. The 1/2 recipe was perfect for us.

Monday, January 22, 2024

Goat Cheese Scallion Muffin ゴートチーズと青葱マフィン

My wife found this recipe for “Muffin with goat cheese and chive” in the Washington Post. Since we are big fans of savory cookies and muffins and we happened to have a log of fresh goat cheese getting older in the refrigerator, my wife decided to make this muffin. The only problem was we did not have chives. So we used the green part of scallions and made it goat cheese scallion muffin. This is a nice muffin with soft and moist center and crunchy outside. Probably we could have used less scallion.


Ingredients(makes 12 muffins)
1 1/2 cups (200 grams) whole-wheat pastry flour
2 teaspoons baking powder
1 teaspoon onion powder
1/2 teaspoon baking soda
1/8 teaspoon cayenne pepper
1/4 teaspoon Kosher salt
1/3 cup (80 milliliters) mild-tasting olive oil, plus more for brushing the pan
2/3 cup (180 milliliters) buttermilk
1/2 cup (113 grams) plain Greek yogurt (homemade)
1 large egg
1 teaspoon honey
4 ounces (115 grams) fresh goat cheese (chevre), crumbled
1/4 cup green part of fresh scallions, finely chopped (original recipe calls for 1/2 cup or 22 grams of finely chopped fresh chives)

Directions:
Position a rack in the middle of the oven and preheat to 375 degrees. Brush a nonstick muffin tin with olive oil.

In a medium bowl, whisk together the dry ingredients; the flour, baking powder, onion powder, baking soda, scallions, pepper and salt until combined.

In a large bowl whisk together the wet ingredients; goat cheese, buttermilk, yogurt, oil, egg and honey until everything is mixed and creamy. Add the flour mixture to the milk mixture and stir until just combined.  

Using a 1/4-cup (60-milliliter) measure, divide the batter among the muffin tin cups; each should be filled about three-quarters of the way.

Bake for 18 to 20 minutes, or until the tops are golden brown and a toothpick or cake tester inserted into the center comes out clean.

Transfer to a wire rack and let cool for 5 to 10 minutes, then run a small offset spatula or butter knife around the perimeter of each muffin before removing them from the tin. Serve warm.
The muffin had a nice scallion flavor which became better and more mellow with time. We are not sure if using chives may have been a bit gentler flavor. In any case, we used shy of 1/4 cup which can be reduced further, although we do not mind the scallion flavor at all. The texture was extremely tender. This was a hardy muffin with a nice robust flavor. Great with eggs for breakfast of with soup for lunch.

Friday, December 29, 2023

Tahini- Miso Cookies タヒニと味噌クッキー

As we mentioned before we are big fans of “savory” cookies which will go well with wine rather than as a dessert. My wife has made a few in this category before. Recently she I found her searching for savory cookie recipes. During this search, she came across “Tahini-Miso cookies” at a website called “kitchen stories”. Since we had tahini and miso, it was a “no brainer” to try making these. This recipe uses a lot of white sesame seeds. Good thing I just got a large jar of white sesame from Weee.  The cookies are great with a taste of saltiness from the miso and nuttiness from the tahini and sesame seed coating the surface of the cookies.


I will ask my wife for how this was made.

Ingredients (shown in the picture below)
225 g flour
¾ tsp baking soda
½ tsp baking powder
115 g butter (room temperature)
220 g brown sugar
100 g sugar
80 g white miso paste
80 g tahini
1  egg
1½ tsp vanilla extract
100 g sesame seeds


Directions:
Add flour, baking soda, and baking powder a bowl and mix to combine, then set aside. Add butter, brown sugar, and sugar to a separate bowl and beat with a hand mixer until very light and fluffy, approx. 5 min.

Add miso and tahini to the butter-sugar mixture and mix until combined. Scrape down the sides of the bowl and mix again. Add egg and vanilla and mix just to combine, then add some of the flour mixture and mix in on low speed. Add remaining flour and mix just until combined.

Add sesame seeds to a bowl. Use an ice cream scooper to scoop some of the cookie dough, then add to the bowl of sesame seeds and cover the ball with the sesame. Transfer to a parchment-lined baking sheet. Repeat until all the cookie dough is gone, (first picture below). Then cover the baking sheet with plastic wrap and chill dough for at least 2 hours, or overnight.

Preheat oven to 350F. Remove some cookies from the baking sheet so there’s enough room for them to spread out while baking. Bake the cookies for approx. 8 min., then use a fork to gently flatten them a bit. Continue baking for 8 - 10 more mins. Let cool completely.


I did not remove any of the cookie dough from the baking sheet as advised in the instructions. They seemed evenly spaced even if they spread a bit. In addition, the instructions said to flatten them with a fork half way through which implied they needed that additional step to spread at all. I tried flattening them as instructed but it was a complete waste because the soft dough just stuck to the tines of the fork making a mess of the cookie so I stopped and just put them back in the oven to finish cooking. At the correct time I opened the oven door and…SURPRISE! The cookies had flattened into an almost solid mass as shown in the picture below; completely unexpected. (Why in the world did the original recipe require flattening them during cooking when they would do this on their own?)


Nonetheless I was able to break them apart into irregular cookie like shapes. Despite the shapes they tasted pretty good. These were not really savory cookies but they also were not as sweet as a desert cookie. They had a slightly chewy texture and deep rich flavor from the miso and tahini. The sesame added an additional nuttiness but they tended to continually fall off the cookie creating a bit of a crumby mess. I’m not sure I will use them next time.

Tuesday, December 26, 2023

Blue Cheese Walnut Cookies ブルーチーズと胡桃のクッキー

This is an additional installment in the continuing tale of “we are big fans of “savory” cookies which go well with wine.” My wife saw this recipe for “blue cheese walnut cookies” in the Washington Post website and decided she had to make it. We used Cambozola cheese which is a mild blue cheese; sort of a cross between blue (Gorgonzola) and Camembert cheeses. The cheese tastes better than it smells and while the cookies were baking in the oven, the entire house was filled with the smell of the cooking cheese which was not totally pleasant. In any case, the end result is worth it. The cookie is a bit crumbly with a mild cheesy and walnut flavor.


I ask my wife to take over.

Ingredients
3 1/2 ounces good-quality, mild blue cheese (we used Cambozola cheese)
3 tablespoons unsalted butter, at room temperature
1/2 cup flour
1/4 cup cornstarch
1/4 teaspoon coarse salt
1/8 teaspoon freshly ground black pepper (we used cayenne pepper)
1/3 cup walnuts, finely chopped

Directions
Preheat the oven to 325 degrees. Line a baking sheet with parchment paper. Combine the flour, cornstarch, salt and pepper in a bowl and set aside.Combine the blue cheese and butter in the bowl of a food processor; pulse until thoroughly blended. We also added the walnuts to the mixture in the food processor and pulsed until they were cut up too. According to the instructions at this point we were to add the flour, cornstarch, salt and pepper into the cheese mixture and mix until a moist dough was formed. Since the food processor we were using was pretty small, we transferred the contents of the food processor to the bowl of dry ingredients to make the dough. Gather up the dough into a flat disk. Roll out the dough to a thickness of 1/4 inch. Use 2-inch cookie cutters to cut out shapes (We just cut the dough into 1 inch squares using a knife).

Transfer to the baking sheet, spacing the cookies 1 inch apart. Bake for 12 to 14 minutes until lightly golden on the edges. Transfer to a wire rack to cool completely before serving or storing.

As I mentioned earlier blue cheese cooking in the oven is not a pleasant smell. We were a little afraid of what the cookie would taste like after smelling it cook. (Not only did it smell bad but the smell permeated the entire house). Luckily the cookie tastes much better than it smelled. Initially the cheese taste was s bit strong but over time it mellowed into a tangy flavor that went very well with the included walnuts and above all goes well with the red wine we were having.

Sunday, December 10, 2023

Eggplant, Avocado and Nagaimo Gratin ナスとアボカドの長芋グラタン

I made this dish for lunch one day from what we had on hand and what we need to finish before it went bad. I just winged it without any particular recipe. As a result I was not sure how it would come out but it was certainly edible and quite interesting (in a good way).


The main items are Asian eggplant, avocado and grated nagaimo mixed with an egg (in leu of Béchamel sauce). I also added tomato and shiitake mushroom sautéed with shallot, just because I had them.


Ingredients:
One Asian eggplant (pale purple and long), cut into a bite size by cutting at 45 degree angle as I turned the egg plant (“Rangiri” 乱切り)
One avocado, cut into a bite size pieces similar to the eggplant (I only had half of a leftover avocado).
Nagaimo, about 200grams, peeled and grated
One large egg
3 skinned Campari tomatoes, seeds removed and cut into small cubes
1 tbs of chopped shiitake mushroom and shallot sautéed in olive oil (I made this few says ago mostly from the stems of the shiitake mushrooms)
Cheeses (I used sharp cheddar and parmesan but any melting cheese will do), the amount is arbitrary
2-3 tbs olive oil

Directions:
Sauté the eggplant in 2 tbs of olive oil the skin side down first then brown all other sides (4-5 minutes)
Place the eggplant and the avocado in the bottom of a small Pyrex baking dish.  Add the remaining 1tbs olive oil.
Mix the grated nagaimo and the egg and pour over (see below)


Top with the mushroom mixture, the tomatoes, and the  cheeses and bake for 30 minutes at 350F (I used the toaster oven in convection mode) (see below).


Let it stand for 5 minutes and serve (the first picture).

I was not sure the grated nagaimo and egg ratio but it came out ok. This is a sort of healthy Béchamel sauce substitute. The eggplant and avocado went well together. The next day, we placed the remaining dish in smaller individual ramekins and added a bit more cheese and toasted it in the highest setting. It heated up very nicely.

Sunday, December 3, 2023

Hazelnut Olive Oil Cake ヘーゼルナッツ、オリーブオイルケーキ

The other day, while we were grocery shopping at Whole Foods, my wife came back with “Hazelnut meal” and “Coconut flour”. She was obviously very curious about these fancy flours; specifically, what were they used for and what did they taste like? It appears that these nuts meal/flours are mostly used for gluten free (GF) cakes and cookies. In any case, she looked for recipes using that used hazelnut meal and found  this hazelnut olive oil cake recipe. This is a very moist cake with a distinctive hazelnut flavor and also slight olive oil flavor. We really like it and the flavors got better with time.


The cross section shows very moist and succulent interior.


This gluten-free and daily-free (GF, DF) recipe came from an on-line site called the recipetineats. I will ask my wife to take over.

Ingredients
150g / 5oz hazelnut meal (1 3/4 cups firmly packed) (almond meal can be substituted)
1/2 tsp baking soda sifted
Zest of 1 lemon, finely grated (about 2 teaspoons or so)
Pinch of salt
1/2 cup + 1 1/2 tbsp extra-virgin olive oil (medium quality is OK)
1 cup sugar
3 large eggs , at room temperature
2 tsp vanilla extract

Directions
Preheat oven to 340°F. Grease a 20 cm/8" springform pan with olive oil then line with baking paper (parchment paper), then grease the paper. In a medium bowl, mix the hazelnut meal, baking soda, lemon and salt. In a large bowl, beat the olive oil, eggs and sugar for 2 to 3 minutes on speed 7 or 8 until it becomes pale and thick (like pouring cream or runny mayonnaise). Add vanilla and beat on speed one for 10 seconds. Add the Dry ingredients and mix in gently using a rubber spatula. Pour the batter into the prepared pan and bake for 45 minutes. It will puff up dramatically in the oven but it collapses as it cools. Remove from the oven and allow the cake to fully cool in the pan before releasing from the springform pan. This is a rustic cake that has higher edges and a flatter centre.

This cake is very moist and has a lovely slightly sweet nutty hazelnut flavor with a background flavor of olive oil. The olive oil adds to rather than overwhelms the overall experience. Interestingly, although this cake was very good right out of the pan it got better and better with time. The flavors melded together and got richer. This went very well with a morning cappuccino.

Thursday, November 9, 2023

Broccoli Cups ブロッコリーカップ

When we order broccoli using our grocery home delivery service, we usually get three giant heads (see picture below). It is not possible to consume everything before it spoils so I separate it into florets, steam them and freeze them in Ziploc bags in small batches for future use.


Recently we saw an interesting recipe on YouTube which uses a large amount of broccoli. Although the original recipe uses fresh broccoli, we figured blanched and frozen broccoli should work. As usual, we made substantial changes mostly due to the ingredients available. We really like the idea of making broccoli cups. We could come up with different kinds of stuffings. In any case, this was our first try.  The stuffing was a bit crumbly.


The broccoli cups retained their shape well.


Ingredients: (made 9)
For the broccoli cup
4 cup finely chopped broccoli (we used blanched and frozen, separated each frozen florets and chopped up in a small batches using the food processor fitted with cutting blade. If using fresh broccoli, the original recipe grated the broccoli using a box grater) 
2-3 eggs (2 eggs may have been better, excess egg pooled on the bottom of the cup when baked but we did not use 2 chopped boiled eggs in the stuffing which was in the original recipe. So, it sort of worked out)
1/2 cup grated Parmesan cheese (optional)

For stuffing
1 cup finely chopped onion
2 Jalapeño peppers, seeded and veined, finely chopped (or green pepper)
3 cloves of garlic, finely chopped
2 small carrots, peeled and cut into small dice
1/2 cup fresh shiitake mushroom stems, finely chopped (optional, since we had this. First tear length wise and then chop)
1-2 tbs olive oil
1 package feta cheese, crumbled
1/2 cup each grated smoked Gouda and Cheddar cheese

For the sauce (a type of aurora sauce)
Greek yogurt and Mayonnaise equal amount
Ketchup
Parsley and chives, chopped

Directions:For broccoli cups
Mix the broccoli, eggs, and Parmesan cheese
Divide the broccoli mixture in 12 equal portions and place in a muffin tin lined with  paper muffin cups (#1)
Using fingers or spoon, spread the mixture to make a cup (#2)
Bake at 350F for 15 minutes (#3, note the egg pooled on the bottom and cooked)
For stuffing
Sauté the stuffing ingredients except for cheeses in the olive oil for 2-3 minutes and turned down the heat with the lid one for 7 more minutes. Season with salt and pepper
Let it cool down a bit and mixed in the feta cheese

Final assembly
Place the stuffing in the baked broccoli cups (#4)
Top each with the grated cheeses (#5)
Bake 15-20 minutes at 350F (#6)

This is a surprisingly good dish. Next day, we reheated this in the toaster oven and had it as a lunch. Compared to freshly baked, the broccoli flavor it less intense and tasted better. stuffing tended to crumble but tasted great especially the umami the shiitake imparted. We can play with the stuffings to our liking. This is a great recipe to use a large amount of broccoli.

Thursday, October 19, 2023

Chestnut Flour Cake with Persimmons and Buttermilk チェストナッツフラワーと柿のケーキ

This is an another cake my wife made from the new chestnut flour.   She came across the recipe using chestnut flour, persimmons, and buttermilk. Since we happened to have all these ingredients, she went for it. The cake was very moist and had nice chestnut flavor but the persimmon flavor is very subtle (i.e. not discernible at all). It was not too sweet and perfect for breakfast.


Ingredients:
172 grams chestnut flour
148 grams or 5.2 ounces of persimmon puree. *
1/2 cup buttermilk (we used my wife favorite buttermilk from Harrisburg dairies.)
3 eggs, at room temperature
1/4 cup melted unsalted  butter
1 tsp vanilla extract
generous pinch of salt
1 tsp baking powder

* The persimmon came from Weee (#1 below). They are “Fuyu” 富有柿 (which is pronounced “fuyuu” meaning “wealthy”) variety and are called chocolate fuyuu because of the dark brown color of the fruit. They were not expensive but they were small with seeds. (Most commercially grown Fuyu persimmons are seed-less). They were irregular in shape with dark blemishes which made them look like they came from somebody’s backyard tree. But when ripened they are very good with pudding-like consistency and sweet. Only problem was that it was very difficult to remove all the seeds/stones.

Directions:
Preheat oven to 350°F (177°C). Butter 9" cake pan. (Having learned from our previous experience with the chestnut flour cake we added a buttered piece of parchment paper to the bottom of the pan and the cake came out of the pan with no problem) 
Puree the persimmon and set aside (#2). Sift chestnut flour to remove any larger bits/chunks.
Mix dry ingredients in bowl and set aside. Using either an electric mixer or a bowl whisk and beat the eggs. Add other wet ingredients. Fold dry ingredients into wet ingredients until fully incorporated (#3).
Pour batter into buttered pan and put into pre-heated oven for about 30 minutes, until the cake is firm in the middle and a toothpick pulls out clean. Remove from oven and cool on baking rack for at least 30 minutes before serving (#4). We reheated in the microwave for 15 seconds (First picture).


This cake was very moist, slightly sweet with a dense texture. The nutty chestnut flavor came through but we couldn’t identify any persimmon taste. This was a very good addition to breakfast.

Monday, October 16, 2023

Castanaccio Pugliese (Chestnut Flour Cake) カスタナチオ

We like pancakes for breakfast sometimes. One of the unusual ones we like to make is chestnut flour pancake”. Since we are now in the chestnut season, we decided to have the chestnut flour pancake for breakfast one weekend. We keep all exotic and whole grain flours including the chestnut flour in a small freezer in the basement. When my wife got it out, she realized its BUB (best used by) was in 2015. It smelled ok. We went ahead and made the pancakes which were very good but even by our standards this flour was a bit too far past its BUB. We decided it is the time to buy a new batch. We got a couple of bags of chestnut flour and my wife looked for some new recipes to use it. She came across this recipe for chestnut flour cake on-line. Actually, she made a chestnut flour cake with the same Italian name “Castagnaccio” previously. But that cake was quite different from this one. It was very savory and did not use any leavening agent, or sugar but did use fresh rosemary which provided good flavor. Overall, however, we were not crazy about it because it was rather dry and crumbly. The new recipe she found must be a variation of an Italian generic cake called castagnaccio. In any case, the major differences are this cake uses a leavening agent, sugar and coco powder. Instead of herbs such as rosemary this used a combination of nuts and candied fruit. It is much thicker as well. This version is more suitable for breakfast or dessert than the previous version which was more savory and as the original recipe suggested “should be washed down with red wine”. The common thing is that both cakes are quite crumbly. (We ended up eating both of them as crumbs with a spoon.)


Ingredients
1 1/2 cups chestnut flour
1/3 cups sugar
1 tablespoon baking powder
2 tablespoons cocoa powder, plus more for dusting
Pinch of salt
1/2 cup extra virgin olive oil, plus more for brushing
2 tablespoons honey, plus more for serving
2 large eggs
1 cup milk
1 cup of Harry and David’s medley of candied fruit. (The original recipe calls for 1/2 cup raisins and 1/2 cup dried cranberries, plumped in 1/4 cup warm water or wine - preferably Vin Santo).
1/3 cup toasted pine nuts
1/3 cup roughly chopped toasted walnuts (As added measure we added chopped chestnuts)
Confectioner's sugar for dusting

Directions:
Preheat oven to 350F degrees. Prepare a 9-inch cake pan (The original recipe suggested lightly greasing it with olive oil but we had trouble getting the cooked cake out of the pan. We suggest next time greasing the bottom of the pan and adding a layer of greased parchment paper.)
Toast the pine nuts and walnuts. In a large bowl, swift together the flour, sugar, baking powder, cocoa powder and salt. In a separate bowl, whisk together the olive oil, honey, eggs and milk. Slowly pour the liquids into the dry ingredients, whisking very well to avoid lumps. The batter should be smooth and a bit liquid. Add the nuts and dried fruit. Pour the batter into the prepared pan, and bake for 35 minutes, or until the cake begins to puff slightly and the middle is set. Remove from the oven and cool completely before removing from pan.
Dust lightly with confectioner's sugar and cocoa powder and serve with some warm honey.


We found it was difficult to remove the cake from the pan. A portion of it stuck to the pan and crumbled. (See the picture below). (Next time, we will use buttered parchment paper on the bottom of the pan). Even the portion that came out in one piece was difficult to cut into wedges since it kept crumbling. The only good thing was that even the crumbs tasted good.


Although eaten in crumbs this cake was very good. The chestnut flour added a nuttiness to the overall chocolate flavor. The pine nuts, walnuts and dried fruit added little bursts of flavor and texture. The dried fruit was particularly nice because it added a burst of sweetness. Interestingly, over time the chestnuts we added became rock hard and we had to be careful to remove them from every mouthful. We liked this cake better than the previous version my wife made. It would just be nice if it did not disintegrate into crumbs.

Wednesday, July 26, 2023

Apricot muffin アプリコットマフィン

Although we have dried apricots in the pantry, we almost never get fresh apricots. Somehow one day, we got a bag of apricots. We let them ripen on the counter and I processed them (meaning removed the skin and stone) when the apricots were slightly soft to the touch. The apricots appeared ripened and they had a good flavor but the texture was really mush and not pleasant to eat. So I asked my wife if she could use them to make muffins. She obliged and made this apricot muffin. This is a very moist and delicate muffin but not much of apricot flavor….at least we did not waste the fresh apricots we got.


As usual, I will ask my wife to take over. And as usual she took the recipe as “advisory”. For example, the recipe called for 1 cup greek yogurt. That was not readily available but ricotta cheese was so she used the cheese instead.  Also the recipe called for milk and dried apricots. But we were using fresh apricots so she substituted the apricot puree for the milk and dried fruit. But somehow it all still worked!

Ingredients:
2 cups all-purpose flour
¾ cup granulated sugar
1 tsp. baking soda
1/2 tsp. salt
1 egg
1 cup ricotta cheese
½ cup melted butter
1/4 cup pureed apricots

Directions
Preheat oven to 350°F. Puree the apricots and set aside. In a large bowl, mix the dry ingredients together.  Mix the ricotta cheese, melted butter, egg and apricot puree in a separate bowl just until combined. Pour into dry ingredients and mix just until combined. Fill cupcake liners 2/3 of the way full with batter (an ice cream scoop works perfectly for this). Bake for 20-24 minutes, or until tops are lightly browned and a toothpick inserted into the center comes out clean.


These muffins were very good. The texture was surprisingly soft and tender. (Due to the use of ricotta cheese, perhaps?) The flavor was slightly sweet but the apricot was basically not detectable. Nonetheless these muffins were quite a pleasure to have with coffee for breakfast.

Tuesday, June 6, 2023

Ginger Cookie Crumb Muffin

This is probably the last muffin my wife will make from left-over cookies; Because she has used them all up. This time it was using thin ginger snaps. As before, she made crumbs from the ginger cookie and used it as part of the batter. She added finely chopped candied ginger and pecan for good measure. The first time I tasted it, I did not taste strong ginger flavor but the next morning when we had it for breakfast, I tasted much more ginger flavor. A good amount of the pecan also did a good job in adding a nutty flavor. Very nice muffn.


This was not quite following the recipe but she  made it very similar to the “Cookie and cream crumb muffin”. I will ask her to take over.

Ingredients: (makes 12 muffins)
For the muffins:
2 cups AP flour
2/3 cup sugar
2 tsp. baking powder
1/2 tsp. salt
2/3 cup milk
1 tsp vanilla extract
1/2 cup melted butter
1/4 cup sour cream
2 eggs
3/4 cup roughly crushed ginger cookies
1/2 cup finely cut candied ginger (or to taste)
1 cup toasted pecans (roughly chopped)

For the crumb:
1/2 cup butter room temp.
1 tbs. honey
1/4 cup regular sugar
2/3 cup flour
1/4 tsp. salt
1/2 cup of crushed ginger cookies.

Directions:
For the muffins: put the cookies in a plastic sandwich bag and using a meat pounder crush them into large pieces. (Otherwise the CuisineArt chopper has a hard time handling whole cookies. We found it’s attempt to do so is quite pyrotechnic.) Add the pieces to a cuisineArt grinder and process until the cookies are small crumb as shown in the picture below. Set aside.

Preheat the oven to 350 degrees, and line a 12 -cup muffin pan with liners of choice. Set aside.
In a large bowl, stir together the flour, sugar, baking powder, and salt. Set aside. In a small bowl, whisk together the milk, vanilla extract, egg, melted butter, and sour cream until combined. 
Pour the wet mixture into the dry mixture. Add in the crushed cookies and pecans and stir the whole mixture together with a spatula until there are no dry pockets.


For the topping : 
In a medium bowl, using your hands mix the butter honey, brown sugar, sugar, flour, salt and additional crushed cookies until the mixture is creamy and smooth. 
Evenly and generously cover each tin of muffin batter with the topping. Bake muffins for 18-20 minutes, or until just golden. A cake tester should come out clean. These muffins were very flavorful although it took several days for the ginger flavor to fully mature.

The topping was crunchy and the muffin itself was tender in texture with a bright ginger flavor. The pecans added a nice nutty texture and taste. Another great breakfast addition.

Wednesday, May 31, 2023

Mango Chutney Almond Milk Rolls マンゴーチャツネとアーモンドミルクロール

This is another example of my wife’s major morphing of a recipe into her own version. She saw the sweet roll recipe in Washington Post which used almond milk, marmalade filling, orange juice and  orange zest for glaze. Since we did not have Almond milk we ended up making it, although in retrospect, we are not sure why the recipe even calls for Almond milk. We had marmalade but did not have orange zest or orange juice. So my wife used Major grey’s mango chutney instead of marmalade and omitted the orange juice. Since she had some sweetened condensed milk left over from making milk bread she decided to use that in the filling too. This is quite different from the original recipe but when substitution of ingredients is needed, my wife is very inventive. The mango chutney worked very well. In any case, this roll is very tender and slightly sweet and perfect for breakfast.


Ingredients:
For the dough
3 1/2 cups flour, plus more as needed for rolling the dough
1/4 cup granulated sugar
1 tsp. Salt
2 1/4 yeast
2 1/2 cups almond milk (not sure why almond milk is required next time I’ll just use regular milk)
4 Tbs. Salted butter
1 egg

For the filling:
30-50 grams sweetened condensed milk
30 grams butter softened
2 tsp sugar
3 Tbs. Major Grey’s mango chutney

Directions:
Add the dry ingredients; flour through yeast to the bowl of a stand mixer fitted with a dough hook. Add the wet ingredients; almond milk through egg. Mix until smooth dough forms. Knead for 10 minutes. Turn out onto floured surface and shape into a loaf. Put in a bowl, coat the surface with vegetable oil. Cover and put in the dough proofer at 78 degrees until doubled in size. Punch down the dough. Cover and let rest for 10 minutes.

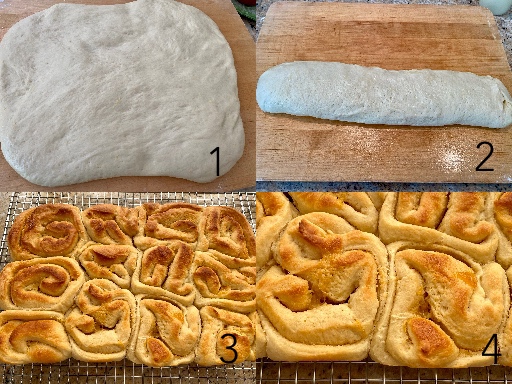
Meanwhile make the filling by mixing together the ingredients for the filling. Roll out the dough into a large rectangle (#1). Cover the rectangle with the filling then roll it up as tightly as possible without squeezing out the filling (#2). Cut the roll into 14 to 16 equal slices. Put the slices cut edge down in a greased pyrex cooking dish. (Note: it is rather hard to cut the slices; they tend to squish. Out of frustration I just made the last part of the dough into a loaf and cooked it on a small cookie sheet. (I did not take a picture of this.) The loaf turned out just fine and could be cut into slices after it was baked. I might do this in the future instead of trying to make the rolls. ) Bake in a 375 degree oven for 20 to 25 minutes until golden brown (#3, #4).


These muffins were quite good. The dough had a crunchy crust but a soft interior. The filling formed a light custard like texture which was slightly sweet but with a lovely hint of spice from the chutney. Several large pieces of mango from the chutney provide a moist surprise burst of flavor. These were perfect flavorful pastries to have for breakfast with coffee.

Wednesday, May 10, 2023

Cookie and Cream Crumb Muffin

This is another muffin made from the chocolate cookie crumbs from the chocolate covered cookies rediscovered in the pantry.


The recipe came from “Dough-eyed” website.

Ingredients: (makes 12 muffins)

For the muffins:
2 cups AP flour
2/3 cup sugar
2 tsp. baking powder
1/2 tsp. salt
2/3 cup milk
1 tsp vanilla extract
1/2 cup melted butter
1/4 cup sour cream
2 eggs
3/4 cup roughly crushed Oreos (we used our crushed chocolate covered cookies)
1/2 cup chocolate chunks (we didn’t have any so we did not include them) 

For the crumb:
1/2 cup shortening, room temp.
1 tbs. honey
1/4 cup brown sugar
1/4 cup regular sugar
2/3 cup flour
1/4 tsp. salt

(Recipe called for an additional 1/2 cup of crushed cookies. Since we didn’t have any left we did not include this.)

Directions:

For the muffins: 
Preheat the oven to 350 degrees, and line a 12 -cup muffin pan with liners of choice. Set aside.
In a large bowl, stir together the flour, sugar, baking powder, and salt. Set aside. In a small bowl, whisk together the milk, vanilla extract, egg, melted butter, and sour cream until combined.
Pour the wet mixture into the dry mixture. Add in the crushed cookies (and chocolate chunks if using them) and stir the whole mixture together with a spatula until there are no dry pockets.
Scoop the batter evenly into your prepared tin, filling each cup about 3/4 full.

For the topping :
In a medium bowl, using your hands mix the shortening, honey, brown sugar, turbinado sugar, flour, salt and (additional crushed cookies if using them).
Evenly and generously cover each tin of muffin batter with the topping. Bake muffins for 18-20 minutes, or until just golden. A cake tester should come out clean.

These muffins were amazing and very good. The topping formed a nice crunchy crust that tasted of toasted butter and honey. The muffin was fairly firm but nicely moist. Interestingly, it tasted distinctly like the cookies we had used. In fact it tasted like the cookies in fluffy format. The chocolate flavor really came through and was very pleasant. Never would have imagined something like this. We probably prefer this rendition of crushed cookie muffins more than the cookie butter crumb version.

Sunday, May 7, 2023

Cookie Butter Crumb Muffin クッキーバターマフィン

This is a continuation of my wife’s saga about finding old forgotten chocolate covered cookies in the pantry and making muffins from them. She found this recipe on the Internet. Since this recipe calls for “cookie butter”, which she did not have, she started the whole saga by making cookie butter and then proceeded to make this interesting (in a good way) muffin. 


The recipe comes from “Bake or Break”

Ingredients:
FOR THE CRUMB TOPPING:
1/2 cup (60g) all-purpose flour
1/4 cup (50g) firmly packed light brown sugar
1/4 teaspoon ground cinnamon
pinch of salt
3 tablespoons (42g) unsalted butter, cold and cut into 1/2-inch cubes

FOR THE MUFFINS:
1 3/4 cups (210g) all-purpose flour
1 teaspoon baking powder
1/2 teaspoon salt
1/4 cup (57g) unsalted butter, softened
1/2 cup (100g) firmly packed light brown sugar
1/2 cup (140g) cookie butter* (such as Biscoff or Trader Joe's Speculoos Cookie Butter)
1 large egg
1/2 teaspoon vanilla extract
3/4 cup milk

*My wife made “cookie butter” from the chocolate cookies.

Directions:
TO MAKE THE CRUMB TOPPING:
Combine the flour, brown sugar, cinnamon, and salt in a medium bowl.
Add the butter, and mix with your fingers until the mixture forms crumbs. Set aside.

TO MAKE THE MUFFINS: Preheat oven to 375°F. Line or grease a 12-cup standard muffin pan.
Whisk together the flour, baking powder, and salt. Set aside.
Using an electric mixer on medium speed, beat the butter, brown sugar, and cookie butter until thoroughly combined.
Add the egg and vanilla, and mix well. Add the milk and mix well.
Add the milk mixture to the flour mixture and mix until fully blended.
Scoop the batter into the muffin tins using a 3 tablespoon scoop (I used the second largest ice cream scoop).
Distribute the crumb topping over the muffin batter.
Bake 20 to 25 minute, or until the muffins are lightly browned and a tester inserted into the center comes out clean.Cool the muffins in the pan for 10 minutes. Then transfer them to a wire rack to cool completely.


I’m not sure what we expected from these muffins but they were quite good. The topping formed a crunchy crust and the muffins were very tender in texture and pleasantly sweet. Interestingly, the cookie flavor was completely nonexistent. If you were not told, you would never guess cookies were involved in the muffin. I may have detected a slight hint of chocolate but the predominant flavor was cinnamon. Amazing!

Wednesday, April 19, 2023

Broccoli Balls ブロッコリボール

Since we are getting home grocery delivery, the amount of broccoli we get per order is out of our control. For some reason they are extremely generous with the amount they provide; we get three large heads of broccoli in one order. I usually, wash and separate the broccoli into small florets and steam them. Afterwords, I divide the steamed broccoli into small batches and freeze them for later use leaving a few days worth in the refrigerator. In addition, sometimes we get free-be cookbooks with the grocery delivery. My wife was purusing one of these little cookbooks called “from Freezer to Table” and came across a broccoli-centric recipe. This combined with seeing the abundant supply of broccoli we had just received led to a conjunction of the recipe/ingredients planets and my wife decided to make her own version of this recipe.  The original recipe (as would be expected coming from a cookbook about frozen food) used frozen “riced” broccoli and cauliflower. While we had the broccoli (non-frozen, of course) we did not have the cauliflower so my wife used mashed potatoes instead…(don’t ask). In any case, this made a quite good small appetizer that also heat up nicely in the toaster oven.


Ingredients:
1 cup steamed broccoli chopped in the small food processor
1 cup shredded Mozzarella cheese (any cheese would work)
1 cup shredded smoked gouda cheese
1 cup mashed potatoes
1 cup Panko bread crumbs
2 eggs
1/4 to 1/2 tsp onion powder (to taste)
1/4 to 1/2 tsp garlic powder (to taste)
1/8 tsp cayenne
1/2 tsp oregano
1/2 tsp thyme
1/4 tsp salt (optional)

Directions:
Combine all the ingredients (#1). Using medium ice cream scoop drop scoop fulls into small muffin cups lined with muffin papers (#2). Bake in a 425 degree oven for 15 minutes or until golden brown (#3 and #4).


These were very flavorful, crispy bites perfect for appetizers. The garlic, onion and herb flavors were very rich and satisfying. The potatoes added a slightly creamy texture inside the crispness of the outside shell. One word of advice, go light on the salt. The cheese is salty. I used 1 tsp of salt and that was too much. I reduced it in this version of the recipe. These really crisp up nicely the toaster oven.