Showing posts with label Steamed. Show all posts

Saturday, February 25, 2023

Chawanmushi with Wood Ear and Enoki Mushroom 新鮮キクラゲとエノキ茶碗蒸し

This is not a new dish just a variation on an established one but the variation came out rather nicely. Since we received fresh wood ear and enoki mushrooms 木耳、榎茸 some days ago when we got some groceries delivered from the Asian grocery store “weee”, that we tried for the first time,  I needed to use up the mushrooms. I decide to try this combination in chawanmushi 茶碗蒸し. I served this cold and topped it with ikura slamon roe and strips of nori seaweed.


The picture below is before I put on the topping. You can see a piece of shrimp, as well as the wood ear and enoki mushrooms.


I made this exactly as before (3 eggs which is about 150ml and 450ml seasoned dashi broth). Steamed on high for 3 minutes and low for 30 minutes. It came out perfectly. This is not spectacular but the combination of wood ear and enoki gave contrasting texture and subtle flavors. The best thing is that I used up both sets of mushrooms.

Tuesday, March 15, 2022

Uni shutou with salmon roe 雲丹酒盗いくら入り

The last time we bought fresh uni from Maruhide 丸秀, we also got a few “uni shutou” 雲丹酒盗including one with salmon roe 雲丹酒盗いくら入り which was a new choice for us. So, one weekend evening, I served this with our usual squid shiokara イカの塩辛. I also served chawanmushi 茶碗蒸し and simmered Kabocha squash カボチャの煮物. These were nice starters.


Left in the picture below is uni shutou with ikura. Obviously, this is a great combination and we, especially my wife, loves uni-ikura donburi ウニいくら丼. Right is our usual squid shiokara. Both are perfect for sipping sake, although you do not need much, just a bit of taste to go with sake.


I served this chawanmushi cold. I often top this with ikura or uni or both but not this time. I made the dish with shrimp and chicken in addition to shiitake. I added scallion and sugar-snap towards the end of cooking.


The picture below shows simmered Japanese kabocha squash カボチャの煮物. It’s a classic.


This was great start of the evening and the combination of uni and ikura shutou is definitely a favorite.

Tuesday, January 19, 2021

Steamed renkon balls 蒸し蓮根まんじゅう

This is on the theme of fresh renkon lotus root. This is another renkon ball 蓮根まんじゅう but instead of deep frying, this was steamed/microwaved (hence healthier). The original recipe calls for "ginnan" 銀杏 ginko nuts but we did not have it. So I used shelled edamame 枝豆.


I added gentle broth made of kelp-bonito dashi pack and shirodashi 白だし seasoning. I garnished it with more edamame and blanched snow peas.


Ingredients:
200 grams grated fresh renkon, skin peeled, excess moisture drained
1 tbs potato starch
4 shrimp, thawed, shelled and cut into bit size chunks
20 shelled edamame, cooked

For broth.
200 ml kelp and bonito dashi (made from dashi pack), heated
2-3 tbs shirodashi 白だし or 1tbs mirin and 1 tbs light colored soy sauce

you could thicken the broth by adding potato starch slurries (optional)

Direction:
Mix all ingredients in a bowl.
Made 6 small balls.
Using a microwave safe silicon container, I microwaved for about 2 minutes or until done.

Place one ball in a small bowl, add hot broth and garnish.

The texture is very different from the deep fried version. Much softer and gentler. We like this variation and it is easier to make. Some recipes suggest wrapping the balls in plastic wrap and microwave but I did not like the idea of microwaving in plastic wrap. That’s why I used a microwave safe silicon container instead.

Sunday, September 13, 2020

Chawan-mushi with “ikura” salmon roe 冷製茶碗蒸しイクラのせ

 This is not a new dish but it was the second appetizer for the evening when we had the tuna caprese as the first dish. This is a cold chawan-mushi which I made in the morning.  I topped it with “ikura” salmon roe and garnished with “ao-nori” 青海苔 a type of dried green seaweed called laver.


For this version of  chawan-mushi , I used shrimp, chicken and scallion since I did not have the other items I usually use.


Ingredients: (for 6 small cups such as the sized container shown above)
3 large eggs (150-170 ml)
Broth, three times volume of the eggs (450- 520ml). Any broth including chicken broth will do. I used a mixture of bonito and kelp broth from a dashi-pack and broth I made from shrimp shells. I seasoned the broth with mirin, light colored soy sauce and salt.

6 large frozen shrimp, shell on, thawed, salted, let it stand for 5-10 minutes, shelled and cut into bite sized pieces.
1 cooked chicken tenderloin, shredded.
1/2 scallion, sliced on bias.

Directions
In 6 small bowls, add the shrimp, chicken, and scallion. Mix the eggs and seasoned cold broth, pour the egg mixture through a fine sieve. Steam (I used an electric wok) on high stream for 10 minutes and then lowered the steam and keep steaming until the egg mixture was set (another 10-15 minutes or more).

Instead of eating this hot, I let it cool to room temperature and refrigerated it. I served it cold with Ikura and dried “ao-nori” on top.

Since I did not have other items such as shiitake mushrooms, I used whatever was available. This simpler approach worked very well for this cold chawan-mushi. The addition of the ikura salmon worked very well. It provided a nice texture with a delicate pop in the mouth followed by a  burst of fresh sea saltiness. After this we had another tuna dish.

Friday, March 1, 2019

Shumai with daikon 大根入り焼売

This was my first attempt to make shumai 焼売 and I am posting this as an example of how things don't always work out well in the cooking world. (I can only hope my next attempt may be better). I followed a recipe I saw in a Japanese newspaper on line (Asahi shinbun). Although the meat mixture was just fine, the wonton skin did not stick together or to the meat and the dish became "meatballs with wonton noodles". In any case, I served several examples with two sauces; on the left is rice vinegar with white pepper and the right is soy sauce.


As you can see the skin got loose and separated from the filling after steaming. In any case, it tasted great.


I followed the recipe closely. One unique item in this recipe was using pre-cooked small cubes of daikon in the filling.

Ingredients: (make 14-15 shumai)
Minced (or ground) pork 200 grams (I used my usual hand minced pork tenderloin trimming but meat from the fattier portion may work better).
Daikon 100 grams
Shiitake mushrooms; 1 dried (I used two fresh including the stems torn lengthwise and then chopped. I am sure the dried mushroom may have more umami flavor but I did not have time to rehydrate some).
Wonton skins

Seasoning:
Salt 2 grams (probably 1/2 tsp)
Soy sauce 1 tsp
Ginger juice 2 tsp
Sake 2 tbs
Dry shiitake soaking liquid 2 tbs (I used dashi instead).
Sugar 1/4 tsp
Sesame oil 1tsp
Potato starch (Katakuri-ko) 1/2 tsp

Directions:
1. Peel and cut the daikon into 7 mm cubes and cook in boiling water for 2 minutes. Drain and cool.
2. Mix the seasoning into the pork starting with the salt and mix well.
3. Add the daikon and mushrooms and mix (#1 and #2).
4. Prepare the steamer for continuous steam (#3).
5. Meanwhile, make the shumai by placing the filling in the middle of the wonton skin placed on a circle made from the index finger and thumb, push it in and add more filling to make a cylinder (#4).
6. Place them on the steamer (#5) and cook for 10 minutes (#6)


I think I made 2 mistakes. When I formed the shumai, I needed to pinch firmly so that the side of the wonton skin would adhere better to the filling. When steaming, I should have placed the shumai slightly apart so that they would not stick to each other.

In any case, despite this, they tasted really good. The addition of the daikon added a nice texture and taste. The dipping sauces were also nice. I ended up dipping the shumai in both. I also used some Japanese hot mustard. Later, based on the philosophy that when an unsuccessful attempt at something results in lemons make lemonade, I converted these shumai into another dish. Stay tuned more to follow.

Tuesday, August 28, 2018

Steamed nagaimo with bonito flakes 蒸し長芋のおかかがけ

This is a very simple recipe I saw on the E-recipe site. Nagaimo 長芋 is usually "slimy" which makes it difficult for some to like. Once nagaimo is cooked, however, it looses the "sliminess" but the texture also changes from "shaki-shaki" シャキシャキ or crunchiness to "hoku-hoku" ホクホク. I am not sure how to translate "hoku-hoku" but it is a texture of cooked potato such as "Yaki-imo" 焼き芋.


Just before serving, I added a good amount of bonito flakes which are called "okaka" おかか or  "kezuri-bushi" 削り節 i.e. thinly shaven "katsui-bushi" 鰹節. I just used the pre-shaven kind that comes in one serving sized packages. We added some soy sauce just before eating.


Ingredients and directions:
Nagaimo, skin removed, cut in half lengthwise and then sliced into 1/4 inch slices (below).


Place the nagaimo in a steaming basket after a strong steam started. Cook it for 8-10 minutes.


Just before serving, add bonito flakes and soy sauce.

This is an interesting and simple dish. My wife, has no trouble getting past the nagaimo "sliminess" and thought the crunchiness of raw nagaimo is nicer. She liked another nagaimo dish I recently made with daikon and dressed in "Yukari" red perilla salt and sweet vinegar.

Friday, March 10, 2017

Egg tofu 卵豆腐

On the Japanese food scene, it appears that any food which is rectangular in shape and has a soft texture is called "something"-tofu whether or not tofu actually makes an appearance as an ingredient. Dishes that actually include tofu would include the "Avocado-tofu" I posted previously. However, "Goma-dofu*" which is a signature appetizer at Sushi Taro does not include tofu at all. It is made of sesame paste and "kuzu" starch 葛粉. This is a foundation dish in Japanese vegan or "shoujin ryouri" 精進料理. It also made an appearance, as a vegetarian dish at a dinner we had many years ago, at a Buddhist temple "shukubou" 宿坊 in Koyasan 高野山. Then, there is a dish called "Gisei-dofu" 擬製豆腐, which means "pseudo" or "imitation"-tofu giving the impression that it does not include any "tofu". But, just to further confuse the issue, Gisei-dofu does, in fact contain tofu.  So, bottom line; any dish with a name ending with "tofu" or "dofu*" may or may not contain tofu. Just to be crystal clear, the dish I posted here  is called "tamago-dofu" 卵豆腐 and it does not contain any tofu, although the shape and texture closely mimics silken tofu.

*In the Japanese language, when a compound word ends in a noun starting with the letter "t" like "tofu", the first letter is replaced with "d" and becomes "-dofu" as in "goma-dofu" or "tamago-dofu".


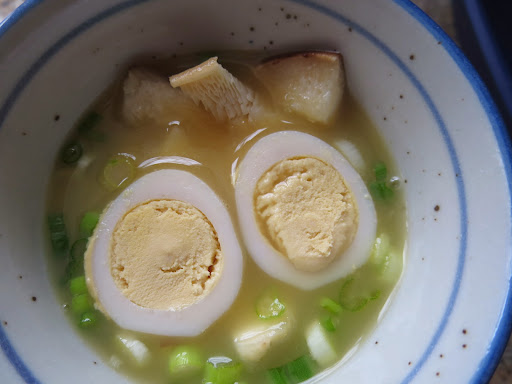
In a perfect world, tamago-dofu should have a totally smooth surface but mine is not a perfect world. Some small bubbles and holes developed (called "su-ga-hairu" 巣が入る) as you can see in the above picture (the steam must have been too strong) but it still had a nice silky texture.  It is often served cold with a bit of sauce and "Kinome" 木の芽, the young leaves of the Japanese pepper tree called "sansho"  山椒. Unfortunately, I do not have access to sansho (one of these days, I would like to have a Japanese pepper tree in my backyard). So, for this serving, I garnished it with dried nori or "aonori" 青のり.


This one I served it with a dab of real wasabi.


Tamago-dofu is essentially a firmer cousin of "chawan-mushi". It is made with a mixture of seasoned broth and eggs but the ratio is 1:1.5-2 instead of 1:3-4.

Ingredients:
4 eggs (about 200 ml)
1.5 times seasoned dashi broth (about 300 ml), I made the dashi broth from dried kelp and bonito flakes and seasoned it with mirin, light colored soy sauce and salt. It should taste a bit stronger (saltier) than clear soup or "suimono" 吸い物.

Sauce: I mixed the dashi, light colored soy sauce and mirin to taste.

Special tool
Japanese stainless steal mold (mine is 7.2 x 7.2 inches or 18 cm, see composite picture #1). The insert lifts out for easy removal of the final product. You could also use a shallow rectangular loaf pan or baking dish but getting the final product out will be more difficult. I would prefer a smaller mold but this what I have.

Direction:
1. Beat 4 eggs and mix with the seasoned broth.
2. Pour the egg mixture through a fine sieve into the mold (#2). It is important to strain out all the chalaza (thick proteinaceous material that is attache to both poles of the egg yolk). This is necessary to attain a silken smooth texture. This is the same when making chawan-mushi.
3. Place the mold in a steamer on low steam (If the steam is too strong the tamago-dofu, will develop holes. This is apparently what I did causing holes to form in this batch). Wrap the lid with a kitchen towel to prevent water condensation from dropping down on the surface of the egg mixture. Steam 25 to 30 minutes(#3).
4. Run a thin bladed knife along the edges of the pan and lift out the insert (#4) to make sure it is done.
5. I then put the insert back and covered the mold. I placed it in the refrigerator to cool.
6. Using a blunt edged knife (such as butter knife to prevent damaging the mold), cut the tamago-dofu into small squares (#5).
7. Using a small plastic spatula, remove each squares (#6) just before serving.


I am not sure if tamago-dofu is worth the effort but it did taste good with a nice texture. Of course, in Japan, this is readily available in individual plastic containers sold everywhere, even in convenience stores. I like chawan-mushi better but this can be served quite elegantly.  I combined cubes of the tamago-dofu with cubes of silken tofu in a clear soup (I did not take a picture). The tamgo-dofu was yellow and more flavorful than the silken tofu but if you were not paying attention, it would be difficult to tell them apart. The consistency was almost identical. I may try again for a more perfect tamago-dofu.

Monday, February 1, 2016

Chawan-mushi flavored with lobster bisque ロブスター味の茶碗蒸し

Whenever we have lobster, I make lobster bisque from the shells and carcasses. This time I used the lobster bisque to flavor chawan-mushi 茶碗蒸し and added crab meat to make a sort of hybrid dish. I garnished it with julienne of radish and snow peas.


I put crab meat in the bottom and also on the top (I placed the top garnish including crab meat after the egg had set).


Ingredients: (6 small containers as seen below)
3 large eggs (about 150ml)
450ml Lobster bisque (or three times volume of the eggs)
Crab meat (more the better)
Snow peas and small red radish for garnish.

I beat the eggs, added the lobster bisque and mixed well. I placed crab meat in the bottom of each container and poured the egg mixture through a fine strainer into the containers. I placed the containers in a wok and steamed for 15 minutes. I checked and turned down the heat so the steam was steady but not so strong the egg mixture would developed bubbles. Once the custard set, I placed the garnishes on top including additional crab meat and steamed for another 5-10 minutes (see below).


This was good. I thought the lobster flavor would overwhelm the delicateness of the dish but it did not. It did not look any different from my usual chawan-mushi but on tasting it, the lobster bisque flavor came to the front in a nice subtle way. The sweet crab meet was also nice.  This variation of chwan-mushi will make our regular (or "teibann" 定番) dish.


Wednesday, May 27, 2015

Savory egg custard with garlic chives ニラ入り茶碗蒸し

This is "chawan mushi" 茶碗蒸し with "nira" garlic chives. When I served garlic chive egg drop soup ニラのかき卵汁 and told my wife that eggs and garlic chives go well together, she suggested I make chawan-mushi with garlic chives. In the interim, I also served "Nira tama" ニラ玉, which is scrambled eggs with garlic chives (I did not take pictures) one weekday evening further reinforceing that this combination was indeed made in heaven. I finally made the garlic chive chawan mushi one weekend.


The garlic chives floated on the surface  but green and light yellow color contrast is nice.


The egg mixture was made the same as before. We tasted this hot first off the steamer. It was nicely creamy as you can see below.


I added shrimp (one cut into two pieces per serving).


I also added small pieces of chicken tenderloin.


Few days later, I served this cold with topping of ikura salmon roe and real wasabi.


Both cold and hot versions were good but I preferred the hot version. The distinct garlic chive flavor was much muted in the cold version. The silky egg custard and the garlic chives are indeed good combination. This time I first soaked the chicken pieces in sake and then coated with potato starch before putting in the chawan-mushi. This made the chicken moist and tender and better than just putting it in "naked".

The below makes 6 small bowls.

Egg mixture:
As before, I used 3 large eggs beaten and added 3 times the volume of seasoned dashi broth. If the eggs are 150ml then the seasoned broth should be 3 times the volume, i.e. 450ml. Dashi broth was made from a "Bonito and kelp" dashi pack. I seasoned it with mirin, light colored soy sauce and "shirodashi" 白だし. Seasoning is always tricky for chawan mushi. Too much will be "too much" especially when eating hot but when you serve it cold you need a bit more seasoning. I err on the side of under-seasoning.

Garlic chive:
The amount is arbitrary. I harvested young tender shoots from our herb garden and cut in 1/4 inch.

Shrimp:
I used 6 shell-on frozen shrimp, thawed in running water and then salted.  I cut in two pieces length wise.

Chicken tenderloin: I used two tenderloins. I first removed the tendon/sinew and sliced it on the bias. I salted lightly and soaked it in sake for 5-10 minutes. I blotted excess moisture and thinly coated it with potato starch or Katakuri-ko 片栗粉.

I first added the shrimp and chicken into the cups and poured in the egg mixture through a fine meshed strainer into 6 cups. I then added the chopped garlic chives.

I placed the 6 cups in a steamer (my electric wok) and steamed them on a constant low steam for 20-30 minutes (first picture).

My wife really liked this, either hot or cold. She thought the chicken was really moist and tender which I agree. This was a very successful dish.

Sunday, January 18, 2015

Steamed brown bread with honey cream cheese 蒸し黒パン

When I made pork buns, I remembered that my wife at one time made steamed brown bread and reminded her of it. She immediately got into action and, on one weekend, made this steamed brown bread. According to her, the classic should have been steamed in a can but she made it in deep ramekins. She said she reduced the amount of molasses since I am not particularly fond of strong molass-y flavor. According to her, this bread is eaten with honey cream cheese which she also whipped up by mixing honey and cream cheese. She sliced thin disks of the bread and smeared on the honey cream cheese. This was really good as a snack or even breakfast.


First, she arranged thusly (above). I said it looks like packman. So she rearranged below.


Here I ask my wife to take over.

This recipe is from a book entitle “Quick Breads” by Beatrice A. Ojakangas
Ingredients:
2 cups All Purpose flour
2 cups cornmeal
2 tsp baking soda
1 tsp salt
3 cups buttermilk
1/3 cup karo syrup + 1/3 cup dark molasses (This combination is what Pa Dutch recipes call “table molasses”. I did this to tone down the molasses flavor to accommodate my husband who is not overly fond of it. If you really like molasses then just use molasses and no Karo for  2/3 cup molasses).
2/3 cup raisins.

In a large mixing bowl stir the flour, cornmeal, baking soda, and salt until blended. Combine the buttermilk and molasses. Add the liquid ingredients to the dry. Mix until well blended. Add the raisins. 

This bread is steamed. Generously grease the ramekins as well as the aluminum foil used to cover them. I prepared the large pot we used for sous vide and the Dutch oven by putting egg steaming trivets from the instant pot on the bottom of each and filling with enough water to come half way up the side of the ramekins (see pictures below).  I used 2 large ramekins and 4 medium sized ones. The two large ramekins plus an optional smaller one could fit in the large sous vide pot. The 4 smaller ramekins, however, also fit well in the Dutch oven so just the large ramekins could go in the sous vide pot. I spooned the batter into the ramekins until they were 2/3 full. I tightly covered them with aluminum foil held on with a rubber band then put them in the steaming pot, water gently boiling so the water came 1/2 the way up the ramekin. I covered the pot and steamed them for about 45 minutes or until a tooth pick came out clean. I removed the bread from the ramekins and let it cool. I sliced the small round loaves in 1/2 inch slices and slathered them with cream cheese with honey mixed in.

This is a very hearty flavorful bread with a bit of tang from the molasses and the buttermilk. The texture is pleasingly dense but moist. The cream cheese offsets the tang and is a perfect accompaniment.


Friday, December 12, 2014

Pork Curry buns カレー肉まん

One of my food memories growing up in Japan is "Nikuman" 肉まん. It was sold in many small neighborhood stores displayed in a tall white square steam case with glass walls on three sides. (This was long before "Konbini" コンビニ or convenience stores made their appearance and became wide spread in Japan. Now-a-days, "nikuman" and many "unique" variations specific to the particular Konbini-chains are popular in convenience stores). Nikuman is a Japanese variation of Chinese baozi (包子). It is modified to better appeal to the Japanese palate. I remember as a kid, the steaming hot round white bun filled with seasoned pork meat was definitely a comfort food especially on cold winter days in Sapporo. Over the years we tried various frozen nikuman here in US. They were edible but a pale shadow in comparison to the ones from my childhood. We even tried some recently at a small Chinese bakery/eatery in San Francisco Chinatown but it was not what I remembered. Recently one of my friends (Chinese) gave me home-made baozi made by her mother. (I greatly appreciate her sacrifice in parting with some so I could taste them). They were by far the best I’ve had.  The flavor, however, was the original Chinese flavor not the Japanese flavor matching my childhood memory. So, I decided to make my own "Nikuman" using my wife's Indian-style pork curry for the filling as a test. (Curry flavored nikuman is definitely a common variation in Japan).


This is mystery to me but my steamed buns came out brown like baked bread (above). Besides, I did not do a great job to sealing the top of the buns as you can see.


I have to assume that the spices in the curry especially the turmeric and mustard must have caused the brown color but as you can see below only surface is brown and the inside is more yellow which is the color of turmeric and mustard.


In any case, my version of "curry nikuman" was pretty good. Although obviously biased, my wife thought this was the best nikuman she has had.

I adapted my version from this recipe. I reduced this recipe in half but the proportion of ingredients especially water in the original recipe was off and ended up using much more water than the previous recipe specified.

Ingredients for buns (made four good sized ones):
Flour: all purpose, 250grams
Dry yeast: 1 tsp
Sugar: 25 grams (I reduced sugar in half)
Baking powder: 1 tsp (I just realized the original asks for baking powder but I used baking soda—they still puffed up).
Water: nearly 2 cups

I combined the dry ingredients in a Kitchen-aid mixer using a dough hook. I mixed at speed 2 and gradually added water until a ball of dough formed on the hook as well as the center of the bottom of the bowl. I removed the dough onto the floured surface and hand kneaded it until it was nicely elastic. I placed the dough in a Ziploc bag (1 gallon) sprayed with Pam, removed the air, sealed, wrapped with towels and let it rise in a warm place for 1 hour or more (until the bulk doubled). I divided the dough into equal sized pieces (I weighed them), formed the pieces into balls and flattened it to a disk. I covered it with a towel and let it rest for 10 minutes (to relax the gluten).

Filling: I used the pork curry my wife made. I just removed the cubes of pork, shredded it by hand and using a fork, I added enough sauce to make it stick together but not too wet.

I flattened the dough and placed the stuffing in the middle on my left hand (#1), Then I stretched the dough and brought the edge to the center and repeated the process until the stuffing was covered and the surface of the buns were sealed (#2 and 3). I placed the buns on a square of parchment paper and put them in a steamer (preheated, #4). I placed on the lid and steamed for 15 minutes (#5 and 6).


To my surprise, The surface of the buns turned brown looking like baked bread. Again, I have to assume this is due to the color of the stuffing leaching out to the surface of the buns but it is not "yellow" like colors of turmeric and mustard.

In any case, the buns were soft and hot. The curry flavored pork stuffing went very well. This is not quite my childhood "nikuman" but good enough for me and my wife really liked it. The left over buns microwaved very well the next day.

Tuesday, March 25, 2014

Savory Japanese egg custard with eggs, eggs, and more eggs ウズラの卵,ウニ,イクラ、カマスの卵のせ茶碗蒸し

Finally my right hand is out of the cast. While the recovery is slow, the strength is coming back and I started cooking again. (my wife was more than happy to turn over the set of cooking knives and all that they entail). To celebrate the fact that I can once again hold a knife and cut sashimi, I ordered blue fine tuna, yellow tail (hamachi) sashimi, and uni from Catalina. In addition, we had some left over caviar from Fine Caviar. We decided to indulge and make a few dishes that would go well with sake. The first one was a Japanese savory (not sweet) egg custard (Chawanmushi 茶碗蒸し) which contained boiled quail eggs and was topped with salmon eggs and golden pike eggs (caviar) and uni.


The chawanmush was served at room temperature (so as not to “cook” the caviar) and garnished with chopped chive and my usual "real" wasabi.


I made the chawanmushi in the same way as before. I mixed 3 eggs (about 150ml) and 450ml of kelp dashi broth seasoned with light-colored soy sauce or usukuchi shoyu 薄口醤油, salt, and mirin みりん. I poured this through a fine-meshed strainer into individual small bowls. Since I was planning to top it with uni and salmon roe, I did not put in any meat or shrimp but just Ginko nuts (銀杏), (from a can), chopped scallion, and fresh shiitake mushroom (sliced) and boiled quail eggs (ウズラの卵, cut in half, from a can) as seen below.


The amount of egg mixture made 6 small containers (actually soba dipping cups). I steamed them rather slowly using an electric wok for 30 minutes until the custard was set. I removed them from the steamer covered them loosely with a paper towel, and let them cool to room temperature. Except for the two we planned to eat in a few hours, I covered the rest with plastic wrap and move them to the refrigerator for future enjoyment.


This is just a variation on the theme of chawanmushi. The uni was not one of the best (Catalina only had "Premium" but "Gold" is the best). Although the flavor of the uni was good, the consistency was much softer and it had slightly slimy texture. Nonetheless the dish was adequately decadent. It was very good. We mixed up all the eggs and the egg custard and enjoyed the symphony of eggs.

Sunday, October 27, 2013

Matsutake Dinner 松茸

When we got 1 lb of matsutake 松茸, we had to concentrate on having an “all matsutake” dinner so that we could finish it before it went bad. Nothing new here but the proof that an all matsutake dinner is definitely not too much of a good thing.  They are similar or identical to I posted before (Sakamushi 酒蒸し, Chawanmushi 茶碗蒸し, Tenpura 天ぷら, Matsutake rice 松茸ご飯, Grilled 焼き松茸, Dobinmushi 土瓶蒸し).

Matsutake rice 松茸ご飯 and clear soup of matsutake 松茸のすまし汁.


Matsutake grilled on touban 松茸の陶板焼き.

CIMG6077

Matsutake chawanmushi 松茸の茶碗蒸し with ginko nuts and chicken.


This was the second version of matsutake omelet 松茸のオムレツ. Instead of chopped scallion, I used chopped shallot.


I think we can wait for one year for the next matsutake feast.

Thursday, December 20, 2012

Steamed marinated duck breast 合鴨の蒸し煮

This is a Japanese way of cooking duck breast and the recipe is based on one I saw on line. This takes some effort since it has to be browned in a frying pan, steamed in marinade and then allowed to rest in the marinade overnight before it can be served. The end result, however, is rather good and the multiple steps worthwhile. This dish will go with sake, beer or wine, maybe sagiovese or syrah but cab saub will be also good.


Duck breast: I had a rather large duck breast. As usual, I scored the skin in criss-cross fashion to expose the underlying fat for rendering. I rubbed salt and pepper sparingly on the skin and meat side.

Initial cooking: I placed the duck in a dry frying pan on medium-low heat with the skin side down. As the fat rendered, I mopped it up using paper towels. After 6-8 minutes, the skin was nicely browned and quite a good amount of fat was rendered. I flipped the breast over and browned other side for just 1-2 minutes.

Marinade: While waiting for the duck breast to brown, I prepared the marinade. In a small sauce pan, I added sake, mirin, and soy sauce in the ratio of 2:2:1 (I made about 1 cup of the mixture) but you may want to adjust the taste of the mixture to your liking in terms of sweet and saltiness by adjusting mirin and soy sauce). I then heated the marinade until came just to the boil. I poured the hot marinade into a deep soup bowl large enough to hold the duck breast comfortably. I  put the duck breast in the bowl with the marinade turning it once to coat all the surfaces.

Steaming: I used an electric wok for steaming. I placed the soup bowl with the duck breast and marinade in the wok with continuous steam for 8 minutes, flipped the duck and steamed another 8 minutes (total of 16 minutes). As you can see, after removing the duck, the surface of the marinade showed a good amount of rendered duck fat (which should to be removed, see below).


I am not sure this is necessary but I hung the duck breast over the sink with a metal skewer through one end and let the blood and fat drip down (picture below) as it cooled to the room temperature.

My wife was somewhat horrified with this step. She said I was losing one of the best ingredients to make a rich sauce. She was alluding to the “duck press” with which French extracted the very last drop of blood from duck carcasses by crushing the bones using the resulting extract for a sauce. I just said, I was following the recipe and that this may be to reduce the gaminess. To which, she retorted “Why would you want to do that. If you do not like a gamey flavor, what’s the point of eating duck?” (I suspect she has a penchant for gamey flavored meats).


Meanwhile, I put the marinade in a sealable plastic container in which the duck breast can snuggly fit. I placed the marinade (without duck in it)  in the refrigerator to cool. After 1-2 hours, the fat was congealed on the surface, I removed most of the fat and placed the now cooled down duck breast in the marinade. I let it marinade 24 hours in the refrigerator before serving.

When I sliced the duck breast the next evening, it was homogeneously rosy pink. Since it was nicely seasoned I did not add any sauce or the marinade but served it with just a dab of Japanese hot mustard.

This was remarkably good. Even the fatty layer developed flavor and unctuous texture reminiscent of well-cooked pork belly. Although it takes some time to prepare, this can be cooked ahead of time and is perfect for a small appetizer with a drink. Maybe next time I will try adding the drained liquid into a sauce.