Showing posts with label pancake. Show all posts

Monday, July 3, 2023

Matcha Almond Pancakes, 抹茶アーモンドパンケーキ

We like pancakes as a breakfast. Our all time favorite is buttermilk blueberry pancake when blueberries are in season. Another one we like is a green pancakes made with spinach and mint. We decided that the flavor comes from the mint but not the spinach so we modified the recipe to use just mint. We like the flavors as well as the striking “verdant”  green color. Recently, we saw a recipe for “matcha almond pancakes”. We both thought ‘we have to make this’. So here they are. A stack of matcha almond pancakes


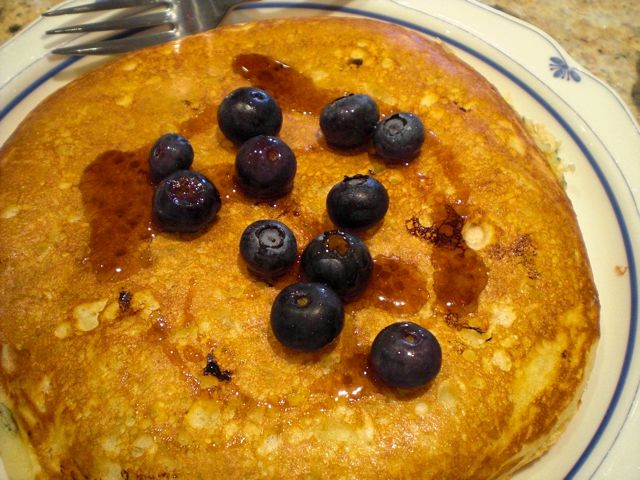
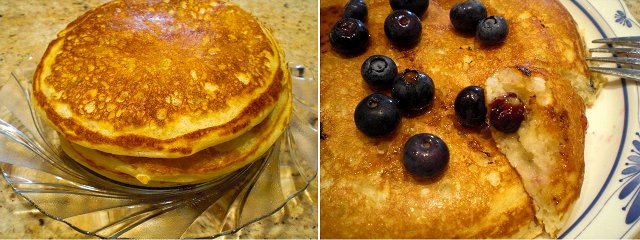
They were quite good. We had this as a breakfast sitting outside on the patio with a cup of cappuccino and mango yogurt made with home-made yogurt with pureed and small cubes of champagne mango mixed in. These pancakes reminded us of the “Matcha green tea cake” we made a few times before.


Ingredients: (The original recipe indicated it makes 8 pancakes but we doubled the recipe and got only 7 pancakes)

1/2 cup plus 1 tablespoon (68 grams) whole-wheat pastry flour or all-purpose flour
1/2 cup (60 grams) almond flour
2 teaspoons baking powder
1/4 teaspoon fine salt
1 tablespoon matcha
1 cup (240 milliliters) whole, reduced-fat or plant-based milk
1 large egg
1 tablespoon neutral oil, such as avocado or canola
2 teaspoons vanilla extract
Maple syrup, for serving

Directions:
In a medium bowl, thoroughly whisk together the pastry flour, almond flour, baking powder and salt until combined. Sift the matcha into the mixture and whisk again to thoroughly combine.

In another medium bowl, whisk together the milk, egg, oil and vanilla until combined. Add the milk mixture to the flour mixture and stir just to combine. Do not overmix; it’s okay if there are some small lumps. Let the batter hydrate for 5 to 10 minutes. (The batter will initially appear quite watery but over the 5 to 10 minutes the flours thoroughly hydrate and it becomes thicker. Nonetheless it was still runnier than our usual pancake batters.)

Heat a large nonstick skillet or griddle over medium-high heat until hot. (To test, drop a dime-size amount of batter into the skillet and if it starts to bubble and brown right away, the pan is ready.)

Working in batches as necessary ladle the batter onto the skillet. Cook until bubbles form on top and the underside is nicely browned, about 2 minutes, then flip and cook until browned on the other side, and cooked through, 2 minutes more. Adjust the heat as necessary to prevent the pancakes from browning too fast before they’re cooked through. Transfer the pancakes to a plate and repeat with the remaining batter.

Serve with maple syrup.

These pancakes were quite good but not great. They were fairly thin in texture. The macha flavor really came through though. They reminded us of the macha cake we made previously. Next time we want a macha pancake we will try just adding some macha to our favorite buttermilk pancake recipe.

Addendum:Culinary grade vs. drinking/sipping matcha:


We have taste tested “Culinary” and “Drinking” grade matcha. Since we are not connoisseurs of matcha, we could not tell the difference. We bought the large can of “culinary matcha” from “Matcha Love” which is run by a Japanese tea company called “Ito-en” 伊藤園. For this type of cooking, this is quite good and reasonably priced.

Monday, April 10, 2023

Firefly Squid Scallion Pancake ホタルイカ入りネギ焼き

Firefly squid season is upon us and we got some from Regalis. I am repeating myself  here but when we visited Kanazawa 金沢 in early summer many years ago, we were introduced  to firefly squid or “hotaru-ika” ホタルイカ. Our favorite way to enjoy firefly squid is “okizuke” 沖漬け but that is difficult to get here in the U.S. The ones from Regalis are boiled. We got two trays, froze one tray and enjoyed the rest. We had this with sumiso 酢味噌 dressing which is the most common and simplest way to enjoy this. The texture of the small squid and very rich flavor from the liver really makes this squid special. This evening I made two dishes; one was our favorite stir-fry of the firefly squid and asparagus shown on the right and another, (new one), was scallion pancake with nagaimo and firefly squid ホタルイカ入りネギ焼き shown on the left. This recipe came from E-recipe


Ingredients (make 4 pancakes)
12 firefly squids (3 per pancake) or more if you like
50 grams grated nagaimo (mine was near 80 grams)
9 tbs chopped scallion (I used 5 stalks)
1 egg (I used 2 eggs)
2 tbs AP flour
1 tsp granulated bonito dashi (I used “Hondashi”ほんだし)
1 tsp soy sauce
1 tbs vegetable oil

Directions:
Since I was using more grated nagaimo than the amount called for in the original recipe, I changed the amount of eggs as a binder. I did not add the firefly squid into the batter initially. I divided the batter into 4 portions and added 3 squid to each batch.

I heated up a non-stick frying pan on medium heat and added the oil. I poured in 4 potions as seen below.


After a few minutes or when the bottoms are set and brown, I flipped the pancakes and lowered the heat and continued cooking for another 2-3 minutes or until the center was done.


I served this pancake with firefly squid and asparagus stir-fly (the first picture). The pancake was very good but we did not see the point of adding the firefly squid. We did not think it did justice to the firefly delicacy since its flavor was somewhat lost in the pancake. We thought adding shrimp would have been more appropriate and that is what we may do next time. In any case, it is nice to enjoy the firefly squid which symbolze spring to early summer.

Friday, June 18, 2021

Crumpet version 2 クランペット 第二弾

After we made blini using a newly rediscovered cast iron pan (supposedly called a "platar"), we challenged ourselves to use it to make crumpets. The last attempt at crumpets was less than successful; those crumpets did not develop the "hole-y" characteristic which makes a crumpet crumpet. This time with a new recipe and the newly rediscovered cast iron pan, we succeeded in making perfect crumpets. We served them with melted butter and a small amount of honey.


The batter is rather runny almost the consistency of pancake batter. In our previous version we used English muffin rings, as recommended in the recipe we were using, but the batter seeped out at the bottom of the ring. We had no such problem with our cast iron pan.


The new recipe had instructions as to how to control the heat to develop multiple holes as shown in the second and third pictures. You can see that while cooking, bubbles developed and then popped creating nice holes.


Ingredients:

1 times the recipe (about 14 crumpets)
300 g. (2 cups) AP flour
400 ml. (1 1/2 cups) warm water
1 tsp. Salt
1 tsp. Sugar
2 tsp. Baking powder (The recipe said baking soda doesn’t work as well)
2 tsp yeast
2 tbs. warm water

1 1/2 times the recipe (about 21 crumpets)
3 cups AP flour (2 cups AP and 1 Cup +2 Tbs. Cake flour) 
600 ml. warm water
1 1/2 tsp. Salt
2 tsp. Sugar
3 tsp. Baking powder (The recipe said baking soda doesn’t work as well) 
3 tsp yeast
3 tbs. warm water

2 times the recipe (this is the recipe I’ve been using) 
600 g. (4 cups) AP flour (or 2 cups AP and 2 cups + 1/4 cup  Cake flour) 
800 ml. (3 cups) warm water (or buttermilk or regular milk)
2 tsp. Salt
2 tsp. Sugar
4 tsp. Baking powder (The recipe said baking soda doesn’t work as well) 
4 tsp yeast
4 tbs. warm water (1/4 cup)

(Use second to largest scoop not completely filled)

Directions:
Bloom the yeast in the warm water. Put the flour, water and salt in the bowl of an electric mixer and beat on speed 5 for 1 minute until smooth paste forms. Add the yeast mixture, sugar and baking powder and mix on speed 5 for another 30 seconds. Cover with cling wrap and put in a warm place for 15 to 30 minutes. The surface should get foamy but it will only increase in volume by 10 to 15 %.

Pre-heat the platar and coat the cups with melted butter. Using a small ladle scoop the batter into the cups. Heat control is key to crumpet success. Stronger heat is needed to begin with to get the holes bubbling. Cook on the higher heat for about 1 1/2 minutes until bubbles start appearing. Then lower the heat so the crumpet cooks through without burning the base, but strong enough to make the bubbles pop. Cook on the lower heat for about 1 minute until the bubbles start popping. Bubbles will start to pop around the edges first then in the center. Finally, lower the heat further and continue cooking for 2 1/2 to 4 minutes until the surface is set and it is clear no more bubbles will be popping. (According to the recipe, at this stage the final bubbles could be popped with the help of a skewer.)  Some wisps of smoke from the butter around the rings may appear. If there is a lot of smoke it means the skillet is too hot. Flip them over to cook the other side for 20 to 30 seconds to give it a blush of color. Cool on a wire rack. 

These crumpets were much better than the first batch we made. They got even better after the second day. We tasted them just out of the pan and the outside was crunchy but the inside was kind of wet and doughy. We initially thought they may not have been cooked through. But by the next day the insides had firmed up and were nicely chewy. The flavor was nicely accented with the taste of browned butter. We toasted them in the toaster oven and served them with melted butter and some honey. Mighty fine! 

Sunday, June 6, 2021

Raised Buckwheat Blini cooked in a “platar”

After making the blueberry buttermilk pancakes, my wife was leafing through the pancake section of the newer (1997 version) “Joy of Cooking” (JOC) cookbook when she found a reference to something called a “platar”. It was accompanied by a drawing of the device and the description; “a platar is a cast iron flat pan with seven round indentations each about 3 inches wide and 1/2 inch deep especially for making blini or other small pancakes”. A bell went off in her head. She immediately recognized the platar as the cast iron pan that has been floating around with our other cast iron griddles and frying pans for years. (Shown in the picture below.) 


We have had it for so long we are not sure how we acquired it and had no idea how it should be used. We vaguely thought it could be used to make biscuits but after some experimentation years ago we discovered that didn’t work. So it resided, taking up room, at the bottom of the stack of various sized cast iron frying pans in a drawer under the stove. She was absolutely delighted to finally find the purpose of the pan as well as the blini recipe on the next page of the cookbook. So this was our project one weekend.


Digression alert: At one time, we were into caviar and we made blini many times. We already had our platar at that time but obviously we did not know its purpose so we made the blini in a frying pan. By-the-way, we looked up (=Googled) the word “platar” and the only reference we could find was a listing in a forum where somebody who, like us, had read the section about platar in JOC asked what it was. The answers appear to suggest nobody knew. Although we could not find anything with the word “platar”, we did find a cast iron skillet that lookedexactly like our platar at Amazon.It was called “SIMLAY CO. Cast Iron Baking Pan”. The advertisement said it could be used to make many things; muffins, biscuits, eggs. Spoiler alert: We tried that years ago...somewhat less than successful. 

We did not have caviar the weekend we used the platar, but we did have "Ikura" salmon roe so we used that to top the blini. (We do not stock caviar but we do try to keep a supply of "Ikura' in the freezer).  The second picture shows the final (blini, sourcream, egg, ikura) dish with a garnish of chopped chives and marinated strawberries that we served that day for lunch. 


We had this with our usual second cup of coffee for the day; "macchiato". (The first cup was cappcino or more like cafe latte). 


I am sure there must be many interpretations of macchiato but our interpretaion is a single shot of espresso topped with 1 tsp. of frothed cream.


As usual my wife made the batter for the pancake and I cooked it. Since I have never used a platar, it was a learning experience. The blini came out better in the later batches. I ask my wife to provide the recipe.


Ingredients:
For Blini (makes about 21 blini)
1 1/2 cup milk
4 Tbs. (1/2 stick) butter
2 tsp. yeast
2/3 cup AP flour
2/3 cup buckwheat flour
2 Tbs. sugar
1 tsp. salt
3 large eggs, lightly beaten

For Blini (recipe X2) (mix in the 6 cup pyrex mixing cup so the batter can be poured rather than scooped into the cooking cups.) 
3 cup milk
8 Tbs. (1 stick) butter
4 tsp. yeast
1 1/3 cup AP flour
1 1/3 cup buckwheat flour
4 Tbs. sugar
2 tsp. salt
6 large eggs, lightly beaten

For topping (everything is to taste and depends on the number of pancakes being served. Also anything can be used. This is just what we came up with.)
sour cream (to taste)
2 eggs, scrambled
1 Tbs. Ikura (salmon eggs) or caviar
Chives finely chopped

Note: Use smallest ladle, Don’t make them too thick.  (Or conversely make them thick enough that they can be cut in half horizontally. That will shorten the cooking time).


Directions:
For the Blini: Melt the butter in the milk. Let it cool to about 105 to 115 degrees. Mix the dry ingredients (yeast through salt) in another bowl. Pour the cooled milk mixture over the dry ingredients mixing until just combined. Cover the bowl with plastic wrap and let it rise in a warm place until doubled in volume (about 1 hour) (#1 in the 3rd group of pictures). Once it has risen either make the pancakes immediately or refridgerate covered for up to 24 hours. (We made the batter after dinner and refridgerated it over night). If refridgerated let it stand at room temperature for 20 minutes (#2). Then deflate the batter and whisk in the  eggs lightly beaten.

Now, I am providing the details of how I cooked blini in the platar. This is for our future reference because this requires some finesse. First, I took out the planar and washed it with hot water (no soap), dried it by heating it on the stove and coated each of the 7 wells with olive oil using a paper towel (#3). I preheated the pan on low flame for 5 minutes then used a small ladle (second smallest ice cream scoop) add the batter, half filling the wells (#4). I continued to cook until the surface of the pancake showed bubbles and looked dry (5-7 minutes). Then came the challenge of flipping them. According to my wife,  the directions in the JOC said flip the pancakes over using a skewer. But that proved entirely too simplistic. After some experimentation I came up with a method of loosening the blini by running the tip of a dinner knife around the perimeter of the well, then inserting the knife tip under the bottom of the blini to pry it loose. Then with the knife under the blini and a bamboo skewer inserted into the top I flipped it (#5). As I repeated the process I got better and could flip the pancake without damaging the side. But I noticed that the 6 wells surrounding the center well had uneven heat and only the outer half got browned (#5). So with the next batch, I released the blini before they were ready to flip and turned them180 degrees in the well then cooked them for a few more minutes before flipping them over. In the next batch, the first side was more evenly browned (#6).  In any case, when all was said and done, we had at least a few perfect blinis (#7= top and #8=bottom).


I topped one of the “perfect” blini (#1) in the 6th set of pictures, with sour cream (#2), scrambled eggs (#3), "Ikura" salmon roe and finely chopped chives harvested from our herb garden (#4). 
 

This is the height of decadence. The blini had a soft thick texture and a very pleasing robust rustic flavor from the combination of buckwheat flour and yeast. The sour cream, eggs and salmon caviar were an excellent combination with complementary creamy texture. The burst of saltiness from the ikura at the end of the bite was a perfect finale. This is how we will be making blini in the future. Next stop crumpets in the platar. 

Wednesday, May 19, 2021

Blueberry pancake v2 ブルーベリーパンケーキ V2

We always associate fresh blueberries with early summer, although they are now available year-around because they are also produced in South America. One way we enjoy blueberries is by making blueberry pancakes. Recently my wife was talking to her sister, and mentioned that we had just enjoyed blueberry pancakes for breakfast that day. Her sister asked for the recipe and my wife said it was in "The Joy of Cooking" (JOC). (This cookbook is a quintessential fixture of American kitchens and has been continuously published since 1936.) Sometime later her sister mentioned that she had made blueberry pancakes and they were really gourmet because of the addition of cornmeal and lemon zest. My wife was confused because  the JOC recipe she was familiar with did not include cornmeal or lemon zest. As a matter of fact there was no recipe in the pancake section of her JOC that mentioned those two items. So she went back to her sister and asked how she had calculated the amount of cornmeal to substitute for the regular flour called for in the recipe. Her sister replied that she had just followed the recipe in the cookbook. Then it dawned on my wife that her sister was using a different edition of JOC than the one my wife was using. It turns out that my wife's blueberry pancake recipe is from the 1980 edition and the recipe her sister used was from the 1997 edition, (which my wife also has). (I think the newest edition is 2019)**. In any case, my wife decided to try the 1997 edition blueberry pancake recipe her sister had used.

**Digression alert. We basically stuck with the older version of the cookbook because it was the one we were familiar with and particularly once we noticed that some of our favorite recipes from the old cookbook were not in the new cookbook. From an esoteric point of view, I particularly missed the section on how to prepare wild game that was in the old cook book. Although I may never have to use the knowledge that grey squirrels taste better than red squirrels because red squirrels are quite gamy in flavor or that squirrels should be skinned while wearing gloves to prevent possible tularemia infection, it is nice to know such information is available.  Not to mention the "must have" recipes for opossum, porcupine, raccoon or muskrat. 


As before, we "install" the blueberries individually rather than mixing into the batter to ensure even distribution. My wife is in charge of preparing the batter and I am in charge of cooking it.


Here I asked my wife to take over.


Ingredients:
2 cups AP flour
1 cup yellow cornmeal
1/2 cup sugar
2 1/2 tsp baking powder
1/2 tsp baking soda
1/2 tsp salt
2 1/2 cups buttermilk
8 Tbs. (one stick) butter melted
4 large eggs separated
3 tsp lemon zest

Directions:
Mix the dry ingredients flour through salt in a mixing bowl.
Mix the wet ingredients, buttermilk through the 4 egg yolks in another bowl.
Add the lemon zest to the wet ingredients.
Whip the 4 egg whites until peaks are stiff but not dry.
Mix the wet ingredients into the dry ingredients until just combined.
Carefully fold the whipped egg whites into the batter.
Put a teaspoon of olive oil in a frying pan then scoop a ladle full of batter into the preheated pan and cook until done flipping once.


These pancakes, like the previous version, are very good. Both are nicely fluffy and have a pleasant mildly sweet taste with a lovely burst of flavor from the blueberries. This version has the addition of a mild lemon flavor. We didn't detect any addition flavor added by the cornmeal. Both recipes make a mighty fine pancake.

Wednesday, August 28, 2019

Fluffy "soufflé" pancakes 日本のスフレパンケーキ

We have been a big fan of pancakes; making so many different types over the years.  Our division of labor is that my wife prepares the batter and I cook the pancakes. While we were browsing through YouTube, we came across "fluffy pancakes".  We first saw a Korean version and then a Japanese version. We came across quite few recipes on line. The constant factor in all the recipes is separating the eggs yolk, whipping the white and incorporating it into the yolk, flour mixture.  Then cooking the pancake on low flame with a cover or lid piling up more batter while it is cooking to give it height (or thickness). The differences among the recipes are the amount of sugar and eggs and type flours (either AP or cake flour). Also, we both remember making a type of fluffy pancake in which separated yolk and whipped egg white were folded into the batter but apparently we did not blog it or this was before we started our blog and we do not remember the details at all. So, one weekend, we made this fluffy pancake for lunch. We served the pancakes with a  fried egg (using pasteurized eggs).


Our pancakes did not fluff up as much as seen in the YouTube videos but still pretty fluffy. For the sake of picture taking, we served three pancakes but we divided this up and we each ate one and half pancakes.


My wife came up with a reasonable hybrid of all the recipes she browsed.

Ingredients (makes three small pancakes):
1 egg, yolk and white separated
1 tsp (5g) sugar
2 tbs (20g) milk (we used light cream)
1 tbs (10g) vegetable oil
4 tbs (32g) cake flour
2/3 tsp baking powder
A pinch of salt
A dash of vanilla extract

Ingredients (X 2 makes 6 small pancakes):
2 egg, yolk and white separated
2 tsp (10g) sugar
4 tbs (40g) milk (we used light cream)
2 tbs (20g) vegetable oil
8 tbs (64 g) cake flour
1 1/3 tsp baking powder
A pinch of salt
A dash of vanilla extract

Directions:
Mix the egg yolk, sugar, milk, and oil in a bowl with whisk until foamy and well mixed (#1).
Add the cake flour and mix until incorporated.
In a stand mixer, whip the egg white to hard peak
Add 1/3 to the flour egg yolk mixture and mix using a whisk (#2), fold in the remaining egg white using a spatula.
Meanwhile preheat a non-stick frying pan on low flame for 10-15 minutes and melt butter, spoon in the batter (#3) and put a lid on. After few minutes, add more batter on the top to make it thicker.
After 10-15 minutes, turn the pancakes over (#4) and cook another 5 minutes with a lid on.


When we had this, I had a Proust's "Madeleine" moment. The texture and taste of these pancakes transported me back to Sapporo 札幌 when I was a kid and my father took me and my brother (don't tell Mother) to an ice cream parlor*. This pancake really reminded me of those  pancakes (they were called hotcakes back then. It appears that  they still serve them but  they are now called pancakes).  Next time when we go back to Sapporo, we have to go there and try the pancakes. As to this version, this is our first attempt at this. We will certainly try to perfect this recipe.

* This was called "Yuki-jirushi" parlor 雪印パーラー. (The picture shows the old location which I visited as a kid). It was run by a big dairy company in Hokkaido. It is still in operation. It moved from the original location to its current location in a nearby building in April, 2017. Until then, it was at the same place we went to as a kid so many years ago.

Sunday, December 31, 2017

Caviar and blinis キャビアとビリニ

At one time, we were into caviar including "fake" caviar made from kelp and other ingredients. But after all our experimentation, we decided caviar was not worth it. We rather prefer salmon caviar (or "Ikura") and other fish roe. But the occasion called for caviar and champagne this time, so I got Israeli Osetra caviar from a local gourmet grocery store. We decided to make blinis as the caviar delivery system. My wife dug into her recipe box and found this recipe. We tried several blinis recipes when we were in our caviar tasting mode and decided this was the best among them. We used sour cream. (We were not prepared to make creme fraiche) and garnished with chopped chives.


Certainly, the combination of caviar, blinis, sour cream and chive was perfect. We did not have a particularly special champagne and opened Champagne Philippe Prié Brut Tradition which was pretty good.


The below was the entire setup. We even took out our caviar server (on the lower left).


This is the 1 oz (30grams) we got.


The blinis were good but a bit denser than we expected.


Ingredients:
3 cup milk, warm to 110 degrees
1 tablespoon butter, at room temperature
2 egg yolks, beaten
3 cup all-purpose flour
1 cup buckwheat flour
1 teaspoon salt
2 egg whites, at room temperature and beaten until stiff
1/4 cup butter, for cooking

Directions:
In a bowl dissolve the yeast in the milk. Stir in the butter. Cover and allow to sit for 10 minutes.
Stir in the egg yolks.
Sift together the flours and salt. Slowly stir into the yeast mixture. Mix well.
Fold in the egg whites and mix thoroughly. If necessary add some more milk to get the right "pancake" consistency.
Preheat griddle over medium heat and melt some of the butter. Drop the batter, a tablespoon at a time onto the griddle a couple of inches apart. Cook until the cakes are lightly golden on both sides, about 1 1/2 minutes on each side. Repeat until all the butter and batter are used up. Drain the cakes on paper towels. Sprinkle with the salt and serve warm with caviar and creme fraiche.

As a special treat this was very good. Next time we may add more milk as necessary to get a thinner consistency. Its astounding how fast 1 oz of caviar can disappear!

Tuesday, December 19, 2017

Green Pancakes 緑のパンケーキ

We like pancakes. My wife collects pancake recipes. Usually, she puts the batter together and I cook the pancakes. This is an interesting and visually stunning pancake. The original recipe came from Washington Post. This was topped with a mixture of fresh goat cheese and Greek yogurt.


The green color is from spinach and mint. The flavor of mint prevails.


Ingredients (from WP)
2 cups flour
3 tablespoons sugar
1 teaspoon kosher salt
2 tablespoons baking powder
2 large eggs, separated into whites and yolks
2 cups whole milk
7 ounces fresh spinach (we cooked spinach without adding water until wilted). Squeeze out as much moisture as possible
1/2 cup lightly packed fresh mint leaves with stems (1/2 ounce; use tender leaves and stems; avoid using dark, tough stems)
4 tablespoons (1/2 stick) unsalted butter, melted
Olive oil
1/2 cup fresh goat cheese, for serving (we used a mixture of goat cheese and Greek yogurt)
1/2 cup strawberry preserves, for serving (we did not use this)
1/2 cup roasted unsalted pumpkin seeds, for serving (we did not have this).


Version #2 with cake flour (no spinach)
1 cup AP flour
1 cup + 2 Tbs. Cake flour
3 tablespoons sugar
1 teaspoon kosher salt
2 tablespoons baking powder
2 large eggs, separated into whites and yolks
2 cups whole milk
2 cups lightly packed fresh mint leaves  (1 ounce; use tender leaves.)
4 tablespoons (1/2 stick) unsalted butter, melted
(This was the version we used 6/18/2022)


Directions:
Stir together the flour, sugar, salt and baking powder in a bowl.
Beat the egg whites in a separate, clean bowl, until they form stiff peaks.
Combine the egg yolks, milk, melted butter, spinach and mint in the vitamix blender and process until fully incorporated (#1) Pour that mixture into the flour mixture and stir well. Gently fold in the egg whites (all at once) (#2).

Coat a small nonstick skillet lightly with the olive oil and heat over medium-high heat (#3).
Scoop up the batter (using the largest ice cream scoop) and pour into the center of the skillet.
Cook until browned in spots on the bottom side and bubbles have formed around the edges, 2 to 3 minutes.
Use a spatula (and wrist action) to flip the pancake to cook the second side.  (#4). Repeat to use all the batter
Serve right away, topped with goat cheese (savory) and/or with strawberry preserves (sweet). Top with pumpkin seeds. (we used a mixture of goat cheese and Greek yogurt).


This is an amazingly good pancake. The green color is rather stunning. The flavor was very good, although we do not particularly taste spinach, mint flavor is quite nice. The texture was also pleasantly moist. We do not think the topping is not particularly needed. Perfect breakfast with Cappuccino.

Saturday, November 21, 2015

Dutch baby ダッチベイビー

We like to eat different things for weekend breakfast. Somehow we remembered that we used make Dutch baby quite often but we have not made it for some time.  In addition, I realized that I have not posted this before. So, one Saturday, I asked my wife to make it. We served this with roll-up smoked salmon with dill cream cheese, cucumber onion salad dressed in rice vinegar and Greek yogurt and wedges of tomato dressed in my mustard honey dressing.


The pancake nicely puffed up.


This is rather easy recipe but I will asked my wife to fill in.

Ingredients:
1/2 cup all purpose flour
1/2 cup milk
2 Tbs. sugar
1/4 tsp. salt
2 eggs
1/2 tsp. vanilla
Preheat oven to 425 degrees. Combine the ingredients until moist (first picture below). Melt butter in a cast iron skillet over medium heat (second picture below). Pour batter into the pan and cook 1 minute (do not stir) (third picture below). Transfer pan to oven and cook for 18 minutes.


She also used a heavy cast iron skillet, preheated on medium high flame.


When the batter was poured in the edges bubbles up and made noise.


She placed the skillet in the oven and cooked for 18 minutes. It browned and puffed up nicely.


This is after it was taken out from the pan.


She cut it into 4 pieces and we each had two.


We should make this more often. This is indeed a wonderful pancake for breakfast.

Monday, November 9, 2015

Chestnut flour crepes with honey Ricotta 栗の粉クレープ

This is a continuation of the seasonal chestnut flour recipes. This is a  recipe by Mario Batali.  We served it with very ripe and sweet Mission figs.


This is a rather simple recipe.

Ingredients
1 cup chestnut flour
2 extra large eggs
1 1/4 cups water
2 cups ricotta
1/2 cup honey
2 tablespoons olive oil

Directions
Sift the flour into a mixing bowl and beat in the eggs, 1 at a time. Add the water, whisking until smooth. Allow to stand 15 minutes.

Place the ricotta in a mixing bowl and stir in half the honey.

Heat a 6 to 8-inch nonstick frying pan over medium heat and brush with some of the olive oil. Add 2 tablespoons crepe batter and roll pan to distribute evenly and thinly. Cook until the crepe is firm on the underside and is curling up at the edges, about 1 minute (see below picture).


Flip the crepe and cook on the raw side for about 30 seconds (see picture below).


Continue making crepes until all the batter is finished, stacking each finished crepe on top of the previous one, to keep them warm. To speed up the crepe making process use multiple skillets.

To serve, spoon 2 tablespoons of the ricotta honey mixture in the center of each crepe, roll it up and placed a dollop of honey Ricotta (the original recipe suggested to put honey but that would have been too sweat for us).


We really liked the honey ricotta. The crepes are a bit dry/brittle (or "bosoboso" ボソボソusing Japanese expression) but had a unique flavor of chestnut. We will not get chestnut flour just to make this crepe in the future, though.

Tuesday, November 3, 2015

Chestnut flour pancake 栗の粉のパンケーキ

When we got this year's shipment of North American Chestnuts I prepared my usual Chestnut rice and other chestnut dishes. In an effort to expand our seasonal chestnut repertoire my wife hit the internet and came up with several recipes using chestnut flour. This is an ingredient we have never used before so my wife had to hit the internet again to find where we could purchase some. She got chestnut flour from Amazon and we made these pancakes one weekend. This also uses almond flour which we just happened to have in our freezer (how it got there and why is another story).  By the way, this pancake is gluten free if that is important to you.


For a pancake without any wheat flour, this one came out very fluffy. I also added my chestnut in syrup as a garnish.


I used a small amount of maple syrup but this pancake is rather sweet and may not need any additional syrup.


This recipe came from this site. We modified the recipe using our CCK (Common Culinary Knowledge)

Ingredients: (4 pancakes)

- 3 Large Eggs
- 1 Cup Chestnut Flour sifted
- 1/3 Cup Blanched Almond Flour sifted
- 3 Tbs Granulated Sugar
- 2 Tsp double acting Baking Powder
- Pinch of Salt
- 1/4 cup Milk*
- 1 tsp Vanilla Extract
- 1 Tbs. melted Butter

Directions: sift the flours. (This step can not be skipped because the chestnut flour has a tendency to clump and without sifting ends up with several hard lumps). Mix the dry ingredients in a bowl and the wet ingredients in another bowl. Stir the two together. Adjust the amount of milk to get a pourable consistency. Ladle the batter into a hot pan with a little olive oil on the bottom. Cook as you would any other pancake.

*Note: It is important to have a appropriate consistency when making pancake batter. We had to add over 1/4 cup of milk (more like 1 cup) to get a "spreadable" consistency so that the batter would spread in the pan (see below). Probably we could have added more liquid to make it spread to fill the pan. We also omitted "vinegar or lemon juice" included in the original recipe since double action baking powder has it's own source of acid to activate and we judged that "acidic" taste will not be good in the pancake.


The pancake tends to brown quickly because of the sugar.


This is a great pancake.  Despite being gluten-free, it has a very fluffy fine texture. It is slightly sweet and because of the chestnut flour, it has a hint of chestnut flavor as well. Amazingly we were surprised that the pancake seemed to have a “chocolate” flavor. If we did not know how it was made we would have sworn that it included coco powder; although it clearly did not. Because of the special flours, this tends to be a rather expensive pancake to make but we really liked this and we will definitely make it again.

Tuesday, September 22, 2015

Pumpkin pancake パンプキンパンケーキ

Our favorite pancake is blueberry butter milk pancake. During blueberry season we make a batch of these pancakes almost every weekend and freeze the extras we make. They freeze very well. After making the “super secret” pumpkin bread we had canned pumpkin left over so, in keeping with the season, we decided to make pumpkin pancakes. I usually use 4 identical non-stick 8 inch frying pans to make a batch of pancakes. I could make the pancakes without oil or butter in the pan but my wife informed me that the oil is essential for the crispy "fried" edges she likes. My wife found this recipe on line.


Compared to our buttermilk pancakes, these really puffed up much higher. We enjoyed them with small amount of maple syrup and a side of espresso coffee.


The below is a direct quote from the original recipe (italicized) with our modification in parentheses.

Ingredients:
2 cups all-purpose flour
2 tablespoons packed brown sugar
1 tablespoon baking powder
1 1/4 teaspoons pumpkin pie spice
1 teaspoon salt
1 can (12 fl. oz.) Evaporated Milk (We made our own
1/2 cup Pumpkin puree
1/4 cup water
1 large egg
2 tablespoons vegetable oil
Chopped pecan (we first roasted and chopped) 
Instructions:
Toast about a cup of pecans, mix flour, brown sugar, baking powder, pumpkin pie spice and salt in large bowl. Combine evaporated milk, pumpkin, water (we actually just used regular milk), egg and 2 tablespoons oil in small bowl; mix well. Add to flour mixture. Stir just until moistened; batter may be lumpy. (Stir in chopped pecans.)

HEAT griddle or skillet over medium heat; brush lightly with oil. Pour 1/4 cup batter onto hot griddle; cook until bubbles begin to burst. Turn and continue cooking for 1 to 2 minutes. Repeat with remaining batter. Serve with  Pumpkin maple syrup (We just used straight maple syrup). 
This made a total of 10 pancakes. Here is the picture of the 8 remaining pancakes (we ate two). In addition to the pumpkin pie spice called for in this recipe, we did not have evaporated milk either. We have not used or bought evaporated milk for ages. So in addition to making our own pumpkin pie spice, we also made our own evaporated milk. I know what you are thinking; that we have entirely too much time on our hand to do something as silly as that but there were extenuating circumstances. First, we really wanted to make these pancakes, second we had some excess milk that we were wondering what to do with before it went bad. We consulted the internet and found it was fairly easy to make evaporated milk--just simmer a quart of milk until it is reduced by half. (While the process of actually making the evaporated milk was easy, cleaning the pan was not. Trust me, it is worth it to buy it in a can). It took half a day to make and the end product had chunks of "scum" or "membrane" (I assume from the milk protein). We strained the liquid and the end result was fairly thick, deep cream color and tasted pretty good. The funny thing is that this recipe calls for evaporated milk and then adds water. Why not just use regular milk? After all that work we were not about to add water so we used enough regular milk to make the batter of pouring consistency. We have a feeling that just adding milk or a mixture of milk and cream may do just as well as evaporated milk and water.

We really like this pancake. It has a nice pumpkin and pumpkin spice flavor and is nicely moist and fluffy. The canned pumpkin adds some mild sweetness. The toasted pecans added a nice crunch. These pancakes, like the blueberry pancakes also freeze very well. We took these to work for breakfast and they revived nicely in the microwave oven.

Monday, July 4, 2011

Blueberry pancake ブルーベリイ ホットケーキ

Well, you will not find this in Izakaya. I don't remember how the tradition got started but this is a seasonal food we eat every year when blueberries arrive in the market. We always consider blueberry pancakes as an announcement that summer has arrived. They are also associated with having a good time eating breakfast out on the deck on a nice summer morning. It has been blueberry season for some time.  In the U.S. this type of quick cake made in a pan or on griddle is usually called a pancake but they go by many other names such as hot cakes, flap jacks, or Johnny cakes.  For some reason, however, in Japan they are called hot cakes or ホットケーキ. As a kid, I thought the only way to make hot cakes was to buy a hot cake mix in a box or visit "Snow brand" ice-cream parlor  雪印パーラー with my father in downtown Sapporo (Don't tell Mother). Apparently, they no longer serve hot cakes. Now, there is no reason to buy pancake or hotcake mix or frozen batters. We almost never visit IHOP, either.

We tried several different recipes for the batter and came up with this combination. This produces a very light and fluffy pancake. We have a sort of division of labor in their production; my wife makes the batter and I cook the pancakes and both of us "install" the blue berries.

An average American guy (you know who you are) can easily eat a stack of four of these (below on the left, this is 8 inch diameter pancake) as a breakfast. We, however, can only pack away one each (above). (My wife claims that as a child pancakes for breakfast were extra "special" and she once ate ten--I find that hard to believe). As you can see, I garnished the pancake with extra blueberries but no powdered sugar. We usually do not add extra pats of butter either (since there is plenty of butter in the batter). As you may know, once blueberries are cooked they turn purple (image below right). Another thing I did not know while I was in Japan is how good real maple syrup is compared to the fake kind usually served there. 
Batter: This recipe requires buttermilk which may be impossible to get in Japan.  Plain yogurt can be substituted (add milk if the consistency is too thick), however the resulting pancake may miss some of the taste complexity the buttermilk provides. This make 6 pancakes (8 inch in diameter).

I asked my wife to fill in here:

Dry ingredients: The secret to this pancake is using cake flour (2 cups) instead of regular flour. Add to the flour, sugar (1 Tbs), salt (1 tsp), baking powder (1 1/2 tsp), and baking soda (1 tsp). Mix to combine the dry ingredients. 

Liquid ingredients: 2 eggs, 2 cups buttermilk (or plain yogurt), 2 tsp. butter melted. Use a fork to scramble the eggs. Add 2 tbs of the buttermilk to the eggs and mix to temper them. Add the egg mixture and melted butter to the rest of the buttermilk. Add the buttermilk slowly to the dry ingredients whisking in a few quick strokes to make a smooth batter (don't mix too long or they will get tough) 

To cook: I usually use 4 identical 8 inch non-stick frying pans. I preheat them on low flame for 5-7 minutes so that all the batches come out at the same doness. Instead of butter, I use light olive oil. I add more than enough oil  in one pan, swirl, and dump the oil to next pan and so forth. Whatever excess is in the last pan will be poured back to a small bowl. After pouring the batter (I use a one cup ladle) into the pan, we "install" the blueberries by hand. We found that if we mix the blueberries into the batter they tend to clump together so some pancakes have too many berries and are too wet while others don't have enough. To ensure even distribution of the blueberries we throw the blueberries individually into the pancakes as the batter starts to set up (see above picture). (Requires some precision in aim to get the desired effect). Actually my wife really likes doing this. We have to move quickly to get all the berries in before the pancake is too cooked to accept them. When the edge of the pancake looks dry and small bubbles start appearing on the surface, I flip it using a spatula and a flick of my wrist. I then continue cooking for another 2-3 minutes or until done. The above recipe produced a total of 6 pancakes of a bit less than 8 inch diameter.

For us, it is really worth it to buy really good genuine maple syrup since the taste is so much better than the maple flavored sugar water that is so popular. We use the syrup sparingly. This is a very light pancake. The buttermilk gives it a uniquely pleasing taste. The manual "installation" of the blueberries means a proper distribution of sweet berry juice and cake with every bite. It is best to eat this outside on the deck when it is still nicely cool on a sunny summer morning with a cup of cappuccino (We have a decent but all-manual Italian cappuccino machine. We even roast the coffee beans ourselves).